> ## Documentation Index
> Fetch the complete documentation index at: https://docs.threadi.au/llms.txt
> Use this file to discover all available pages before exploring further.
# StopWatch for HubSpot
> This **App Usage Guide** aims to help you get up and running with **StopWatch for HubSpot**, an intuitive time tracking app designed specifically for HubSpot.
Since September 2025, **StopWatch for HubSpot** has been **compatible with all HubSpot Portals**
**StopWatch for HubSpot** has been [Certified by HubSpot](https://ecosystem.hubspot.com/marketplace/listing/hubclock-by-thread-integrations-552213) since July 2024 and was named an [Essential App for Customer Service](https://community.hubspot.com/t/updated-in-the-app-marketplace-essential-apps-for-customer-service/129698) in 2025.
## App Demo Videos
## 1. Installing StopWatch for HubSpot
If you're already using the app in our legacy **Custom Objects mode**, please note that reinstallation will automatically switch your configuration to **App Objects mode**. If your using **Custom Objects mode** and need to reinstall the app, please submit a [support request](https://www.threadi.au/support?app_name=stopwatch) so we can assist you.
Before you can start using **StopWatch for HubSpot**, you must successfully install the app within your HubSpot account. Choose one of the 2 options below to get started.
Install via the HubSpot App Marketplace
Install via direct OAuth link
The user who first installs the app in a given HubSpot Portal is the designated **StopWatch for HubSpot Primary Admin**. Managing additional admins is handled via [user-specific app settings](#user-settings). If you need to update your primary admin, please submit a [support request](https://www.threadi.au/support?app_name=stopwatch)
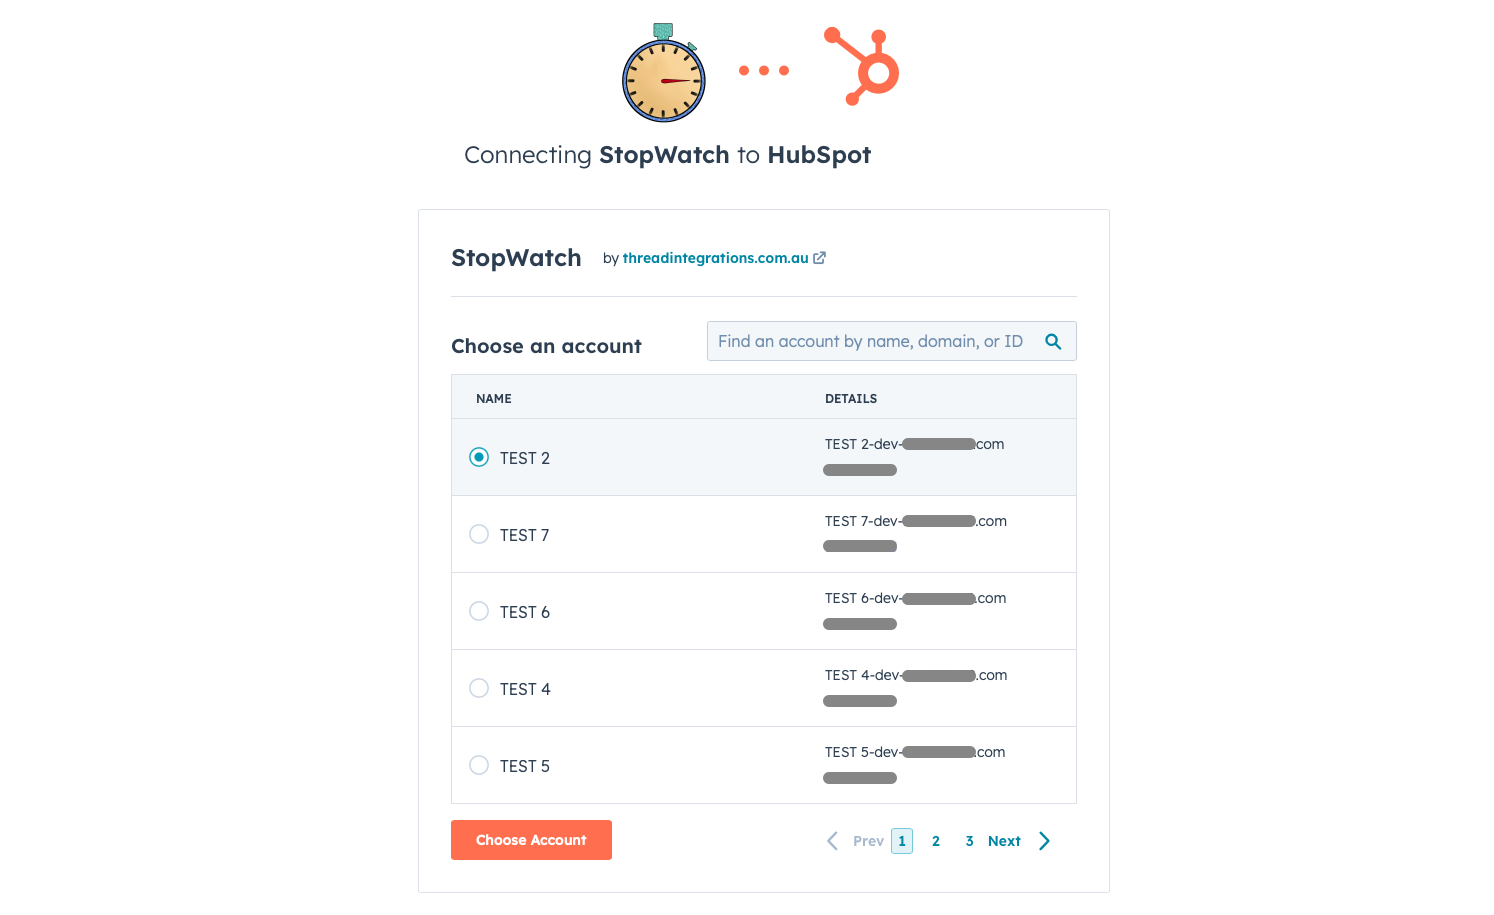
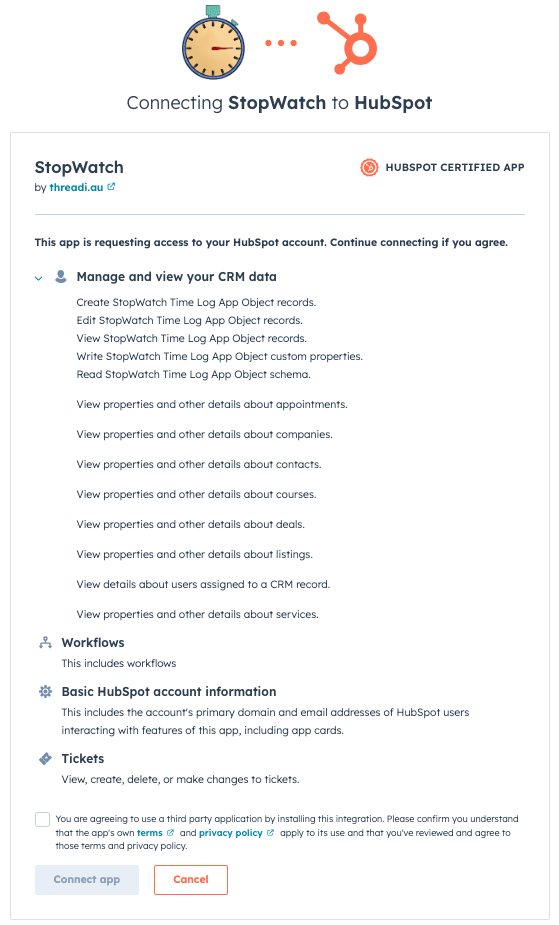
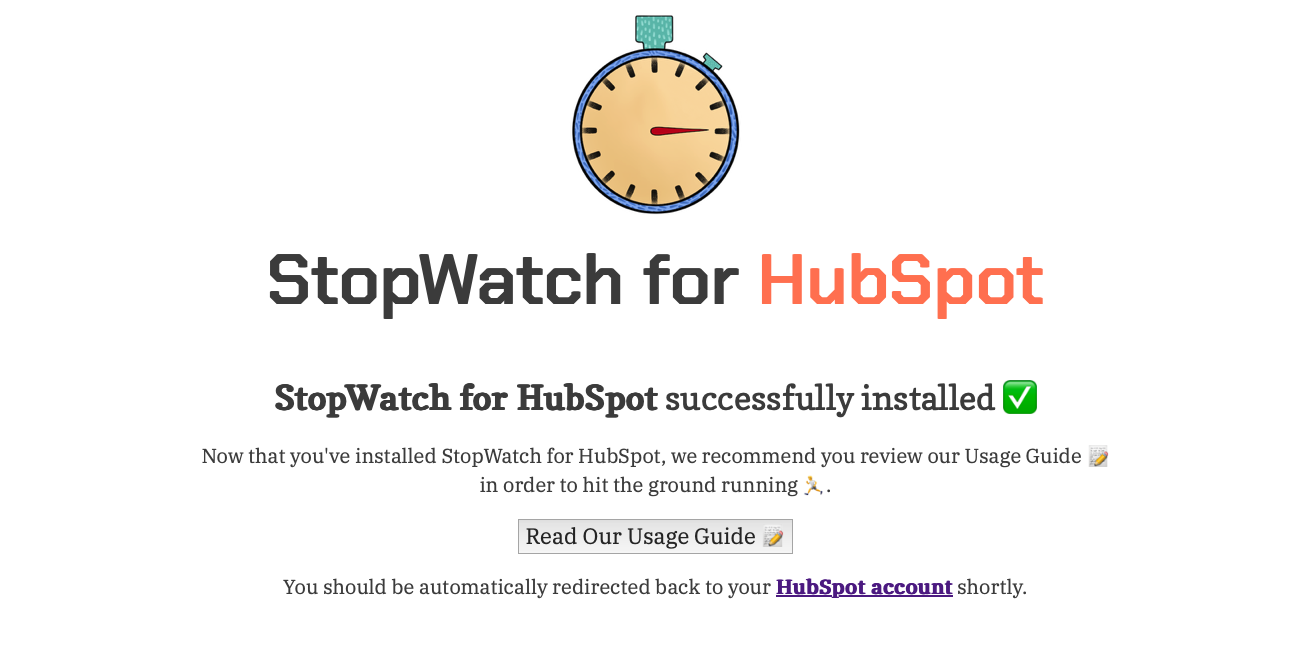
After the installation process is complete, hopefully you'll see an installation success message. If you see an error message, please wait a couple of minutes before trying again. If you see an error message again, please submit a [support request](https://www.threadi.au/support?app_name=stopwatch). For reference, we've included some screenshots of the installation process below.
As part of the installation process, HubSpot will ask you to confirm within which account/portal you'd like to install the **StopWatch for HubSpot** app. You'll then be prompted to allow **StopWatch for HubSpot** access to certain information and permissions relating to the selected HubSpot account. We only request access and permissions necessary to deliver our services. If you'd like to discuss why we need certain access or permissions, please get in touch via email: [support@threadi.au](mailto:support@threadi.au)
### App Installation Process Screenshots
 [Top of section](#installing-stopwatch-for-hubspot)
[Top of page](#)
## 2. Subscriptions and Nominating Users
Free trial ended? Create a subscription to continue enjoying access to all app features
Price Lock Promise: In March 2026, we committed to never raising prices for active subscription holders. As long as your subscription remains active, your price is locked in.
Please ensure you've successfully [installed **StopWatch for HubSpot**](https://stopwatch.threadi.au/) within your HubSpot account before proceeding with any steps outlined in this section.
The first time you successfully install **StopWatch for HubSpot**, you'll gain access to all app features as part of our 💥 **14 day free trial period** 💥. Once this free trial period has ended, you'll need to choose and confirm your **StopWatch for HubSpot** subscription plan.
You can compare all available subscription options on our [Pricing page](/pricing?app=stopwatch). If you select a paid subscription, you'll need to confirm via our third-party payment provider, **Stripe**. Once you've successfully confirmed your subscription, you can manage it via our [customer portal](https://billing.stripe.com/p/login/3csdSc2wP68ybTi144) (powered by **Stripe**).
Links for each subscription option are available [here](/pricing?app=stopwatch). Multiple currency options are available, including AUD, USD, GBP, EUR, CAD, NZD
If you've chosen the **🤗 Free** plan, all you'll need to do to confirm your subscription is nominate your users via our [admin app settings](#app-settings).
Please note, there will be no chance to change or rotate users at a later date. If you need other members of your team to use the app after having already nominated your users, you'll need to upgrade to a paid subscription.
[Top of section](#subscriptions-and-nominating-users)
[Top of page](#)
## 3. App Cards
The **StopWatch for HubSpot** experience, and the quality of your time tracking data, relies heavily on your interaction with the features made available by the app.
We recommend tracking time via our **App Cards** and/or our **Custom Workflow Actions** only. We do not recommend creating or updating "Time Log" records manually or by any means other than interacting directly with **StopWatch for HubSpot** app features.
**Feature Quick Links**
* [Our App Cards](#our-app-cards)
* [Adding App Cards to HubSpot CRM Views](#adding-app-cards-to-hubspot-crm-views)
* [The "StopWatch" App Cards](#the-“stopwatch”-app-cards)
* [Quick Add](#quick-add)
* [Associate Engagements](#associate-engagements)
* [Cancel a Time Tracking Session](#cancel-a-time-tracking-session)
* [Billable Time](#billable-time)
* [Manually Adjusting Time Logs](#manually-adjusting-time-logs)
### Our App Cards
| Name | Object Type(s) | View Location |
| ------------------------------------ | ------------------------------------------------------------------------------------------------------------------------------------------------------------------ | ------------------------------------------------------ |
| **StopWatch** |
[Top of section](#installing-stopwatch-for-hubspot)
[Top of page](#)
## 2. Subscriptions and Nominating Users
Free trial ended? Create a subscription to continue enjoying access to all app features
Price Lock Promise: In March 2026, we committed to never raising prices for active subscription holders. As long as your subscription remains active, your price is locked in.
Please ensure you've successfully [installed **StopWatch for HubSpot**](https://stopwatch.threadi.au/) within your HubSpot account before proceeding with any steps outlined in this section.
The first time you successfully install **StopWatch for HubSpot**, you'll gain access to all app features as part of our 💥 **14 day free trial period** 💥. Once this free trial period has ended, you'll need to choose and confirm your **StopWatch for HubSpot** subscription plan.
You can compare all available subscription options on our [Pricing page](/pricing?app=stopwatch). If you select a paid subscription, you'll need to confirm via our third-party payment provider, **Stripe**. Once you've successfully confirmed your subscription, you can manage it via our [customer portal](https://billing.stripe.com/p/login/3csdSc2wP68ybTi144) (powered by **Stripe**).
Links for each subscription option are available [here](/pricing?app=stopwatch). Multiple currency options are available, including AUD, USD, GBP, EUR, CAD, NZD
If you've chosen the **🤗 Free** plan, all you'll need to do to confirm your subscription is nominate your users via our [admin app settings](#app-settings).
Please note, there will be no chance to change or rotate users at a later date. If you need other members of your team to use the app after having already nominated your users, you'll need to upgrade to a paid subscription.
[Top of section](#subscriptions-and-nominating-users)
[Top of page](#)
## 3. App Cards
The **StopWatch for HubSpot** experience, and the quality of your time tracking data, relies heavily on your interaction with the features made available by the app.
We recommend tracking time via our **App Cards** and/or our **Custom Workflow Actions** only. We do not recommend creating or updating "Time Log" records manually or by any means other than interacting directly with **StopWatch for HubSpot** app features.
**Feature Quick Links**
* [Our App Cards](#our-app-cards)
* [Adding App Cards to HubSpot CRM Views](#adding-app-cards-to-hubspot-crm-views)
* [The "StopWatch" App Cards](#the-“stopwatch”-app-cards)
* [Quick Add](#quick-add)
* [Associate Engagements](#associate-engagements)
* [Cancel a Time Tracking Session](#cancel-a-time-tracking-session)
* [Billable Time](#billable-time)
* [Manually Adjusting Time Logs](#manually-adjusting-time-logs)
### Our App Cards
| Name | Object Type(s) | View Location |
| ------------------------------------ | ------------------------------------------------------------------------------------------------------------------------------------------------------------------ | ------------------------------------------------------ |
| **StopWatch** | - Contacts
- Companies
- Deals
- Tickets
- Projects
- Appointments
- Courses
- Listings
- Services
| CRM Record Page |
| **StopWatch
(Preview)** | - Contacts
- Companies
- Deals
- Tickets
- Projects
- Appointments
- Courses
- Listings
- Services
| CRM Record Preview |
| **StopWatch
(Help Desk)** | | Help Desk |
| **Manage Time Log** | | CRM Record Page |
| **Manage Time Log
(Preview)** | | CRM Record Preview |
Upon special request, the **StopWatch** and **StopWatch (Preview)** App Cards can be made available on HubSpot **Custom Object** views. If you'd like to learn more about using the **StopWatch** App Card with **Custom Objects**, please feel free to make a request via our [support form](https://www.threadi.au/support?app_name=stopwatch).
### Adding App Cards to HubSpot CRM Views
In most cases, **App Cards are hidden by default**. You must follow the steps outlined below to add them to your HubSpot CRM Views.
Open your HubSpot account and click the icon in the top navigation bar.
Use the left sidebar to navigate to Data Management > Objects > *Object Type*
Click the **Record Customization** or **Preview Customization** tab, then find and click the relevant CRM View. If you only have 1 view, it'll likely be called **Default view**.
Hover over the position you'd like to add the App Card, then click the icon. Click into the *Card library* tab and then search for the relevant App Card Name. If it's not already added to the view, click **Add card**.
Reposition the App Card as desired, then click **Save** or **Save and exit**.
For example, to add the **StopWatch** App Card to your **Contact** right sidebar view:
### The "StopWatch" App Cards
Your experience using the **StopWatch**, **StopWatch (Preview)** and **StopWatch (Help Desk)** App Cards should be largely identical. The only difference between these App Cards is where they can be placed.
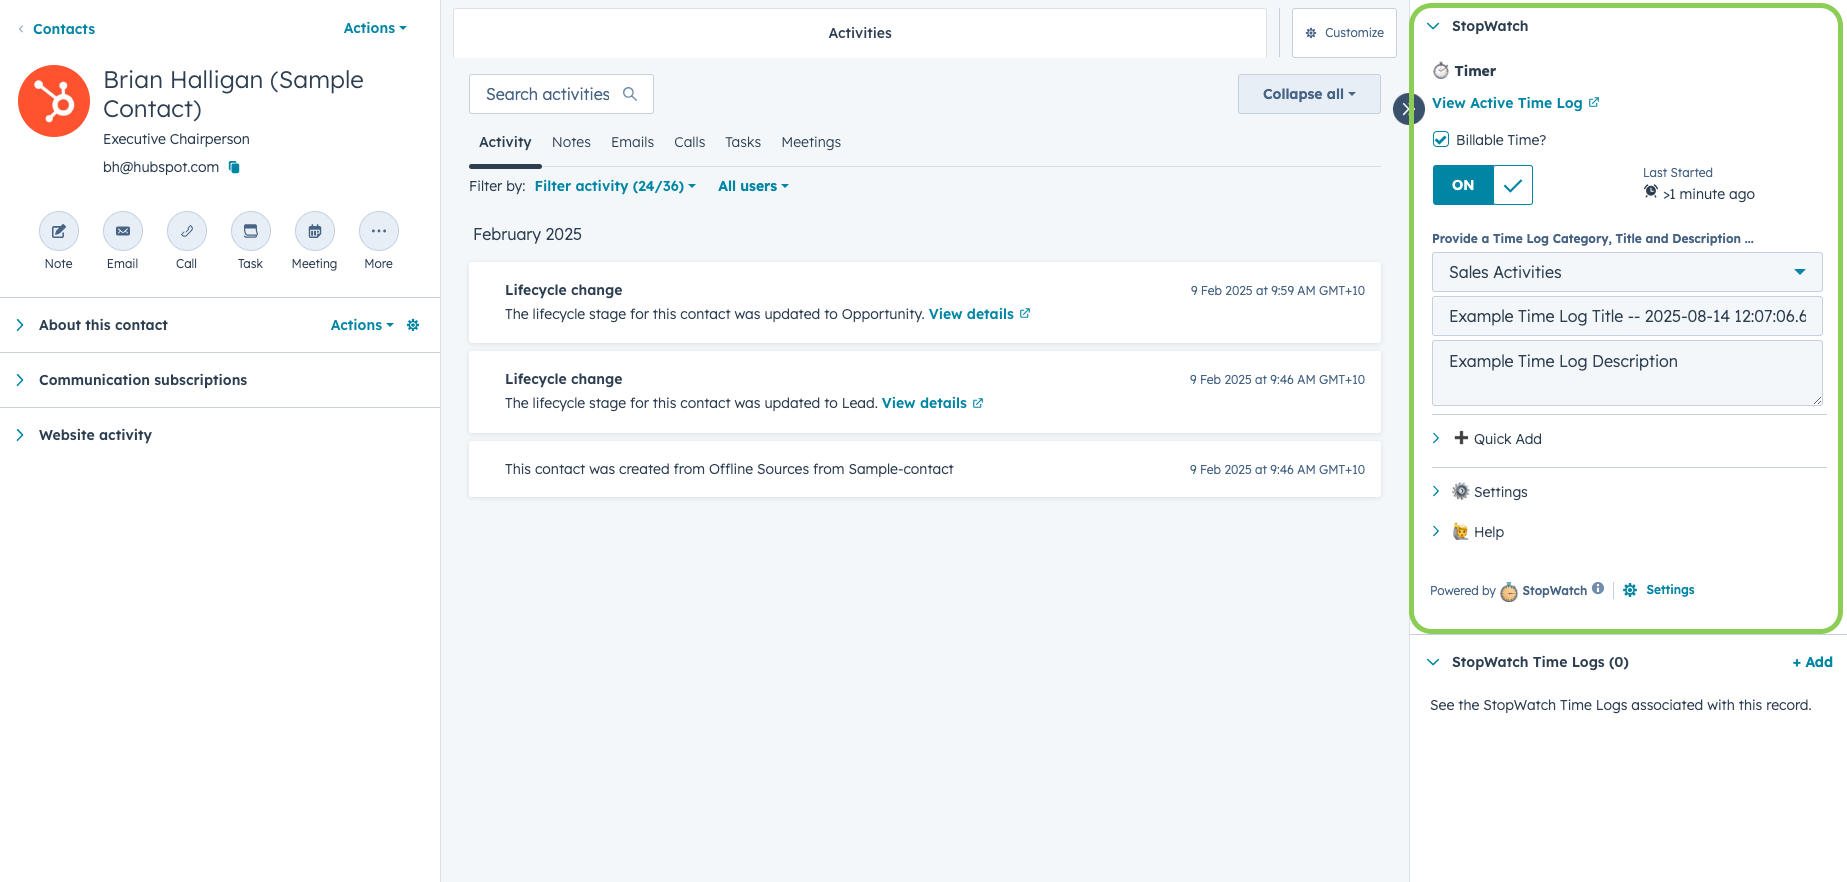 To track time against the CRM record you are viewing (or previewing), use the **⏱️ Timer** toggle visible at the top of the App Card.
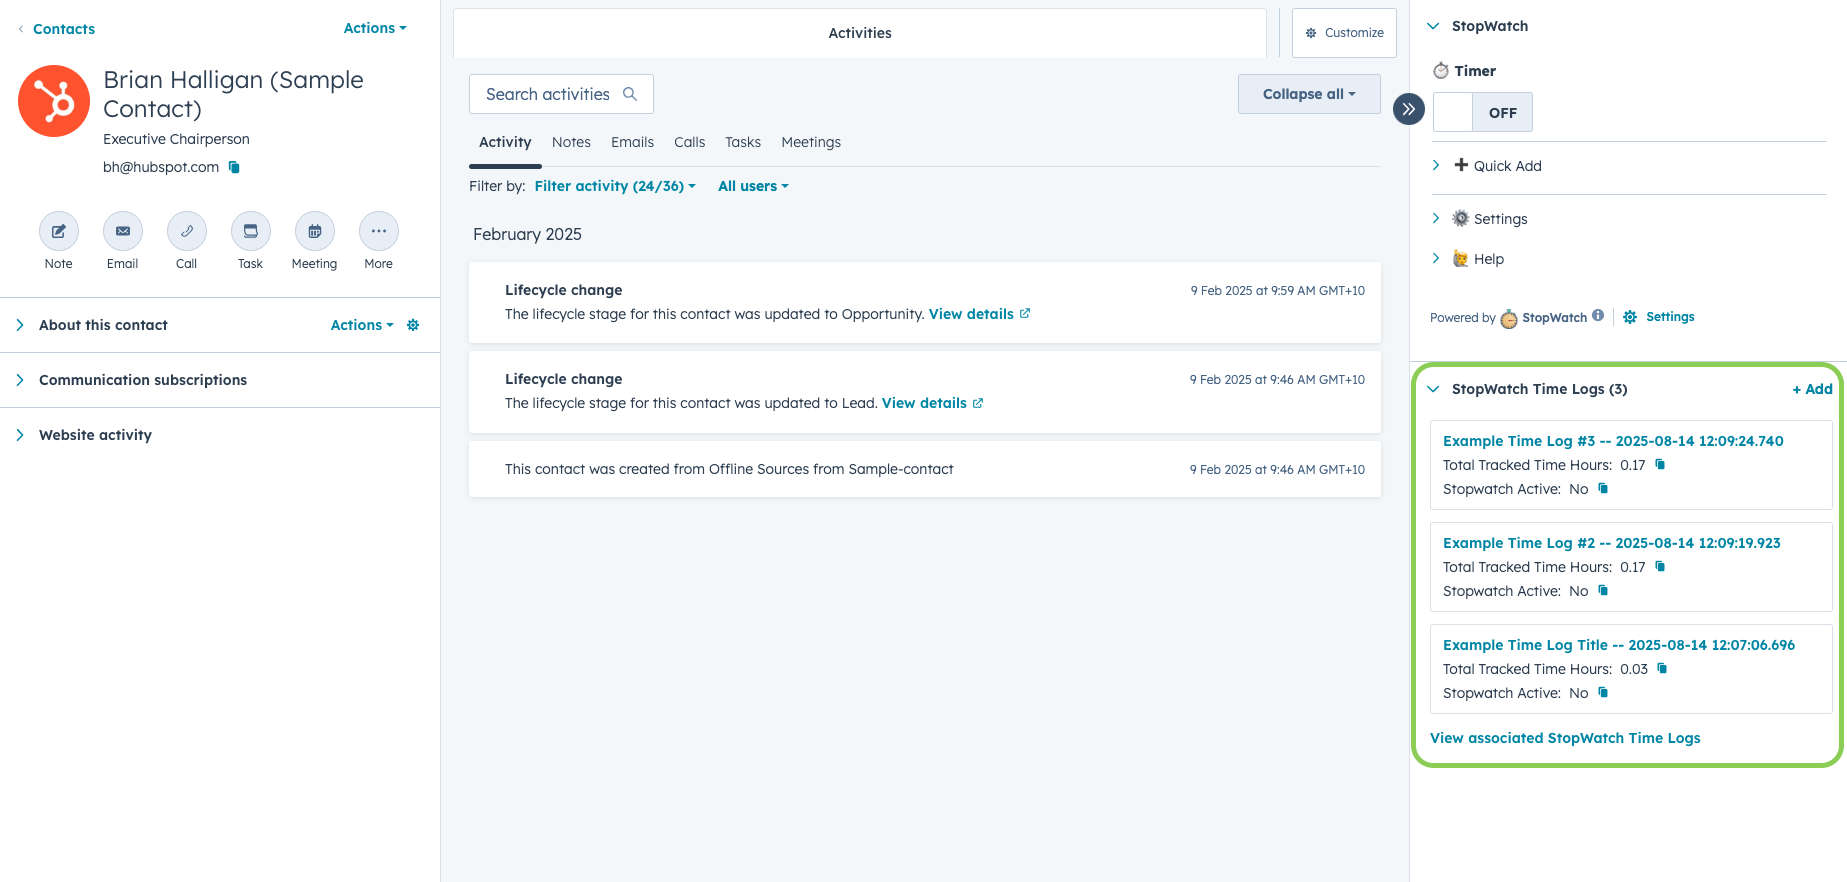
When you use a **StopWatch** App Card to track time against a HubSpot CRM record, the app creates/updates a "Time Log" record and associates it with the record you are tracking time against. You can view and navigate to your Time Log records using the right sidebar (see example screenshot below).
To track time against the CRM record you are viewing (or previewing), use the **⏱️ Timer** toggle visible at the top of the App Card.
When you use a **StopWatch** App Card to track time against a HubSpot CRM record, the app creates/updates a "Time Log" record and associates it with the record you are tracking time against. You can view and navigate to your Time Log records using the right sidebar (see example screenshot below).
 #### Quick Add
The **StopWatch** App Cards offer the ability to **Quick Add** a time tracking session. This is intended to be used in the following scenarios:
| Scenario | Detail | |
| -------------------------------------------------- | -------------------------------------------------------------------------------------------------------------------------------------------------------------------------------- | - |
| **1. 'Batch' / 'end-of-day' time tracking method** | For customers who prefer or need to be able to input historic time tracking sessions manually, rather than inputting time tracking sessions in real-time via the 'Timer' toggle. | |
| **2. Forgotten to track time spent** | For customers who may have forgotten to track time via the 'Timer' toggle and need to be able to manually input the forgotten time tracking session. | |
To use this feature, simply expand the ** Quick Add** section, input all the relevant information relating to the time tracking session you'd like to record and click 'Submit'.
#### Associate Engagements
* **Associate Engagements** is a user-specific setting (disabled by default).
* This feature is only available if the **1 Time Log Per Session** user-specific setting is enabled. Review our [App Settings](#app-settings) section for more information.
You can associate time tracking sessions with specific HubSpot Engagements linked to the CRM record you're viewing. The following HubSpot Engagement types are supported by this feature:
* Tasks (including Subtasks)
* Meetings
* Calls
Simply check the **Associate Engagements?** checkbox in the App Card and select the relevant Engagement record(s) you'd like the time tracking session to be associated with. You can filter the list of available options by Engagements you own and/or Engagement Type. This feature is available when tracking time manually via the timer toggle, as well as via the **Quick Add** feature.
#### Quick Add
The **StopWatch** App Cards offer the ability to **Quick Add** a time tracking session. This is intended to be used in the following scenarios:
| Scenario | Detail | |
| -------------------------------------------------- | -------------------------------------------------------------------------------------------------------------------------------------------------------------------------------- | - |
| **1. 'Batch' / 'end-of-day' time tracking method** | For customers who prefer or need to be able to input historic time tracking sessions manually, rather than inputting time tracking sessions in real-time via the 'Timer' toggle. | |
| **2. Forgotten to track time spent** | For customers who may have forgotten to track time via the 'Timer' toggle and need to be able to manually input the forgotten time tracking session. | |
To use this feature, simply expand the ** Quick Add** section, input all the relevant information relating to the time tracking session you'd like to record and click 'Submit'.
#### Associate Engagements
* **Associate Engagements** is a user-specific setting (disabled by default).
* This feature is only available if the **1 Time Log Per Session** user-specific setting is enabled. Review our [App Settings](#app-settings) section for more information.
You can associate time tracking sessions with specific HubSpot Engagements linked to the CRM record you're viewing. The following HubSpot Engagement types are supported by this feature:
* Tasks (including Subtasks)
* Meetings
* Calls
Simply check the **Associate Engagements?** checkbox in the App Card and select the relevant Engagement record(s) you'd like the time tracking session to be associated with. You can filter the list of available options by Engagements you own and/or Engagement Type. This feature is available when tracking time manually via the timer toggle, as well as via the **Quick Add** feature.
 This feature unlocks powerful reporting and automation capabilities by enabling you to associate **Time Logs** with specific **HubSpot Engagements**.
For example, [build custom reports](https://knowledge.hubspot.com/reports/create-custom-reports) to analyse your time spent on specific Tasks, Meetings and Calls, offering deeper insights into team productivity, project allocation and process efficiency. It also facilitates advanced [automation workflows](https://knowledge.hubspot.com/workflows/create-workflows) that can trigger actions based on time tracked against particular HubSpot Engagements, streamlining your operational processes and enhancing overall performance.
* This feature is not currently available within [**StopWatch Web UI**](#web-ui)
* A maximum of 500 records per Engagement type (i.e. Tasks, Meetings, Calls) are made available for selection
#### Cancel a Time Tracking Session
This feature is only available if the **1 Time Log Per Session** user-specific setting is enabled. Review our [App Settings](#app-settings) section for more information.
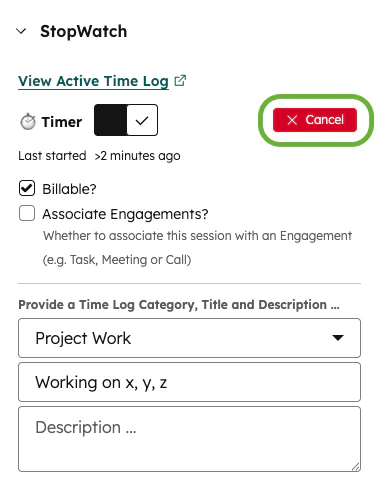
If you no longer wish to submit a time tracking session after starting a timer, use the Cancel button to cancel the session. In the background, this deletes the relevant Time Log record that was created when you started the timer.
If you installed **StopWatch for HubSpot** prior to 1 April 2026, you may need to reauthenticate in order to gain access to this feature. To do this, simply install the app again (there's no need to uninstall first). See the [Installing StopWatch for HubSpot section](#installing-stopwatch-for-hubspot) for instructions.
This feature unlocks powerful reporting and automation capabilities by enabling you to associate **Time Logs** with specific **HubSpot Engagements**.
For example, [build custom reports](https://knowledge.hubspot.com/reports/create-custom-reports) to analyse your time spent on specific Tasks, Meetings and Calls, offering deeper insights into team productivity, project allocation and process efficiency. It also facilitates advanced [automation workflows](https://knowledge.hubspot.com/workflows/create-workflows) that can trigger actions based on time tracked against particular HubSpot Engagements, streamlining your operational processes and enhancing overall performance.
* This feature is not currently available within [**StopWatch Web UI**](#web-ui)
* A maximum of 500 records per Engagement type (i.e. Tasks, Meetings, Calls) are made available for selection
#### Cancel a Time Tracking Session
This feature is only available if the **1 Time Log Per Session** user-specific setting is enabled. Review our [App Settings](#app-settings) section for more information.
If you no longer wish to submit a time tracking session after starting a timer, use the Cancel button to cancel the session. In the background, this deletes the relevant Time Log record that was created when you started the timer.
If you installed **StopWatch for HubSpot** prior to 1 April 2026, you may need to reauthenticate in order to gain access to this feature. To do this, simply install the app again (there's no need to uninstall first). See the [Installing StopWatch for HubSpot section](#installing-stopwatch-for-hubspot) for instructions.
 #### Billable Time
Flagging a time tracking session as **billable** populates a number of Time Log properties that help you keep track of **Billable Tracked Time** vs. **Total Tracked Time**.
**💫 Unlimited** subscribers also have access to the **Billable Amount**, **Cost Amount** and **Margin Amount** Time Log properties, which are automatically populated based on billable rates set by a **StopWatch for HubSpot** Admin user. This is intended to support common invoicing and workforce profitability analysis use cases.
Within the **Billable Rates** [App Settings](#app-settings) tab, app admins can choose between the following **Billable Rate Modes**:
* **👤 User-Based**: billable rates are managed per HubSpot User
* **💼 Service-Based**: billable rates are managed per Service
### Manually Adjusting Time Logs
As much as possible, we recommend you avoid updating Time Logs manually
When selecting Time Log properties for your views, reports and general analysis, we recommend using the **Tracked Time** and **Amount** properties that are appeneded with **"Calculated"** (i.e. not the properties appended with "Legacy"). This is because the **"Calculated"** properties automatically update to reflect changes made to the corresponding **Minutes** and **Rate** properties. **"Legacy"** properties are only updated when a new time tracking session is submitted.
To decrease the likelihood of time tracking data quality issues for our customers, **we generally recommend avoiding manually updating Time Log records**. However, we understand that in some cases this may be unavoidable. If you must adjust the tracked time data stored on an individual Time Log record, there are a few options available to you.
#### Billable Time
Flagging a time tracking session as **billable** populates a number of Time Log properties that help you keep track of **Billable Tracked Time** vs. **Total Tracked Time**.
**💫 Unlimited** subscribers also have access to the **Billable Amount**, **Cost Amount** and **Margin Amount** Time Log properties, which are automatically populated based on billable rates set by a **StopWatch for HubSpot** Admin user. This is intended to support common invoicing and workforce profitability analysis use cases.
Within the **Billable Rates** [App Settings](#app-settings) tab, app admins can choose between the following **Billable Rate Modes**:
* **👤 User-Based**: billable rates are managed per HubSpot User
* **💼 Service-Based**: billable rates are managed per Service
### Manually Adjusting Time Logs
As much as possible, we recommend you avoid updating Time Logs manually
When selecting Time Log properties for your views, reports and general analysis, we recommend using the **Tracked Time** and **Amount** properties that are appeneded with **"Calculated"** (i.e. not the properties appended with "Legacy"). This is because the **"Calculated"** properties automatically update to reflect changes made to the corresponding **Minutes** and **Rate** properties. **"Legacy"** properties are only updated when a new time tracking session is submitted.
To decrease the likelihood of time tracking data quality issues for our customers, **we generally recommend avoiding manually updating Time Log records**. However, we understand that in some cases this may be unavoidable. If you must adjust the tracked time data stored on an individual Time Log record, there are a few options available to you.
 Ensure the **Manage Time Log** and/or **Manage Time Log (Preview)** App Card(s) are added to the relevant CRM View(s), as outlined [above](#app-cards:how-to-add-an-app-card-to-a-crm-view)
Navigate to the relevant **Time Log** record view or preview
Find the **Manage Time Log** or **Manage Time Log (Preview)** App Card and click **Edit Time Log**
Update the relevant input fields and click **Save**
Refer to the **Editing Time Logs** heading within the [**Timesheets**](#timesheets-1) section below
This is the riskiest of options available. If you must use this method, please exercise caution.
If you must directly update Time Log properties, please restrict these updates to the properties listed below. **Any issues relating to changes made to properties not listed below will not be covered by standard StopWatch for HubSpot support**:
* Total Tracked Time Minutes
* Billable Tracked Time Minutes
* Billable Rate
* Cost Rate
* Title
* Category
* Description
* Service Name
* Number of Sessions
* Time Log Week of Year
* Time Log Month of Year
[Top of section](#using-the-stopwatch)
[Top of page](#)
## 4. Time Logs
As part of the installation process, **StopWatch for HubSpot** creates an App Object within your HubSpot account, called **Time Logs**.
### Time Log Variations
Depending on your specific combination of **StopWatch for HubSpot** account and user-specific settings, the aggregation of and data contained within your Time Logs may vary. Expand the following sections for explanations of how Time Logs can vary depending on your settings:
#### 1 Time Log Per Session
Enabling this setting can unlock powerful Time Log segmentation capabilities
"1 Time Log Per Session" is an optional, user-specific setting. It is disabled by default and available only to **👥 Team** and **💫 Unlimited** subscribers.
Each submitted time tracking session results in 1 Time Log Record (i.e. no Time Log aggregation). This unlocks powerful segmentation capabilities by enabling users to set custom Time Log **Titles**, **Categories** and **Descriptions**.
Ensure the **Manage Time Log** and/or **Manage Time Log (Preview)** App Card(s) are added to the relevant CRM View(s), as outlined [above](#app-cards:how-to-add-an-app-card-to-a-crm-view)
Navigate to the relevant **Time Log** record view or preview
Find the **Manage Time Log** or **Manage Time Log (Preview)** App Card and click **Edit Time Log**
Update the relevant input fields and click **Save**
Refer to the **Editing Time Logs** heading within the [**Timesheets**](#timesheets-1) section below
This is the riskiest of options available. If you must use this method, please exercise caution.
If you must directly update Time Log properties, please restrict these updates to the properties listed below. **Any issues relating to changes made to properties not listed below will not be covered by standard StopWatch for HubSpot support**:
* Total Tracked Time Minutes
* Billable Tracked Time Minutes
* Billable Rate
* Cost Rate
* Title
* Category
* Description
* Service Name
* Number of Sessions
* Time Log Week of Year
* Time Log Month of Year
[Top of section](#using-the-stopwatch)
[Top of page](#)
## 4. Time Logs
As part of the installation process, **StopWatch for HubSpot** creates an App Object within your HubSpot account, called **Time Logs**.
### Time Log Variations
Depending on your specific combination of **StopWatch for HubSpot** account and user-specific settings, the aggregation of and data contained within your Time Logs may vary. Expand the following sections for explanations of how Time Logs can vary depending on your settings:
#### 1 Time Log Per Session
Enabling this setting can unlock powerful Time Log segmentation capabilities
"1 Time Log Per Session" is an optional, user-specific setting. It is disabled by default and available only to **👥 Team** and **💫 Unlimited** subscribers.
Each submitted time tracking session results in 1 Time Log Record (i.e. no Time Log aggregation). This unlocks powerful segmentation capabilities by enabling users to set custom Time Log **Titles**, **Categories** and **Descriptions**.
#### Default
By default, when time is tracked against a HubSpot CRM record via the **StopWatch** App Card, information about this tracked time is stored on an associated "Time Log" record. If you use only **StopWatch for HubSpot** app features for creating and managing Time Log records (as is recommended), there should exist in your HubSpot account **1 Time Log record per unique combination of the following variables**:
* **Object Type** (e.g. CONTACT)
* **Object/Record ID** (e.g. 1234567890)
* **HubSpot User ID** (e.g. 12345)
* ***Example**: CONTACT\_1234567890\_12345*
These variables are used to construct the primary Time Log display property (StopWatch Record ID), for example **CONTACT\_1234567890\_12345** (where **CONTACT** is the object type of the record that time is being tracked against, **1234567890** is the relevant Contact record ID and **12345** is the HubSpot user ID of the person tracking the time).
#### Split By Week / Split By Month
"Split Time Logs By Week" and "Split Time Logs By Month" are optional, user-specific settings. They are both disabled by default.
For any period of time where either of the optional, user-specific **Split By Week** or **Split By Month** [app settings](#app-settings) are enabled, there should exist in your HubSpot account **1 Time Log record per unique combination of the following variables**:
Default
* **Object Type** (e.g. CONTACT)
* **Object/Record ID** (e.g. 1234567890)
* **HubSpot User ID** (e.g. 12345)
* ***Example**: CONTACT\_1234567890\_12345*
Split By Week
* **Year** (e.g. 2026)
* **Week Number** (e.g. 50)
* ***Example**: CONTACT\_1234567890\_12345\_2026\_50*
Split By Month
* **Year/Month** (e.g. 202608)
* ***Example**: CONTACT\_1234567890\_12345\_202608*
### Time Log Record View
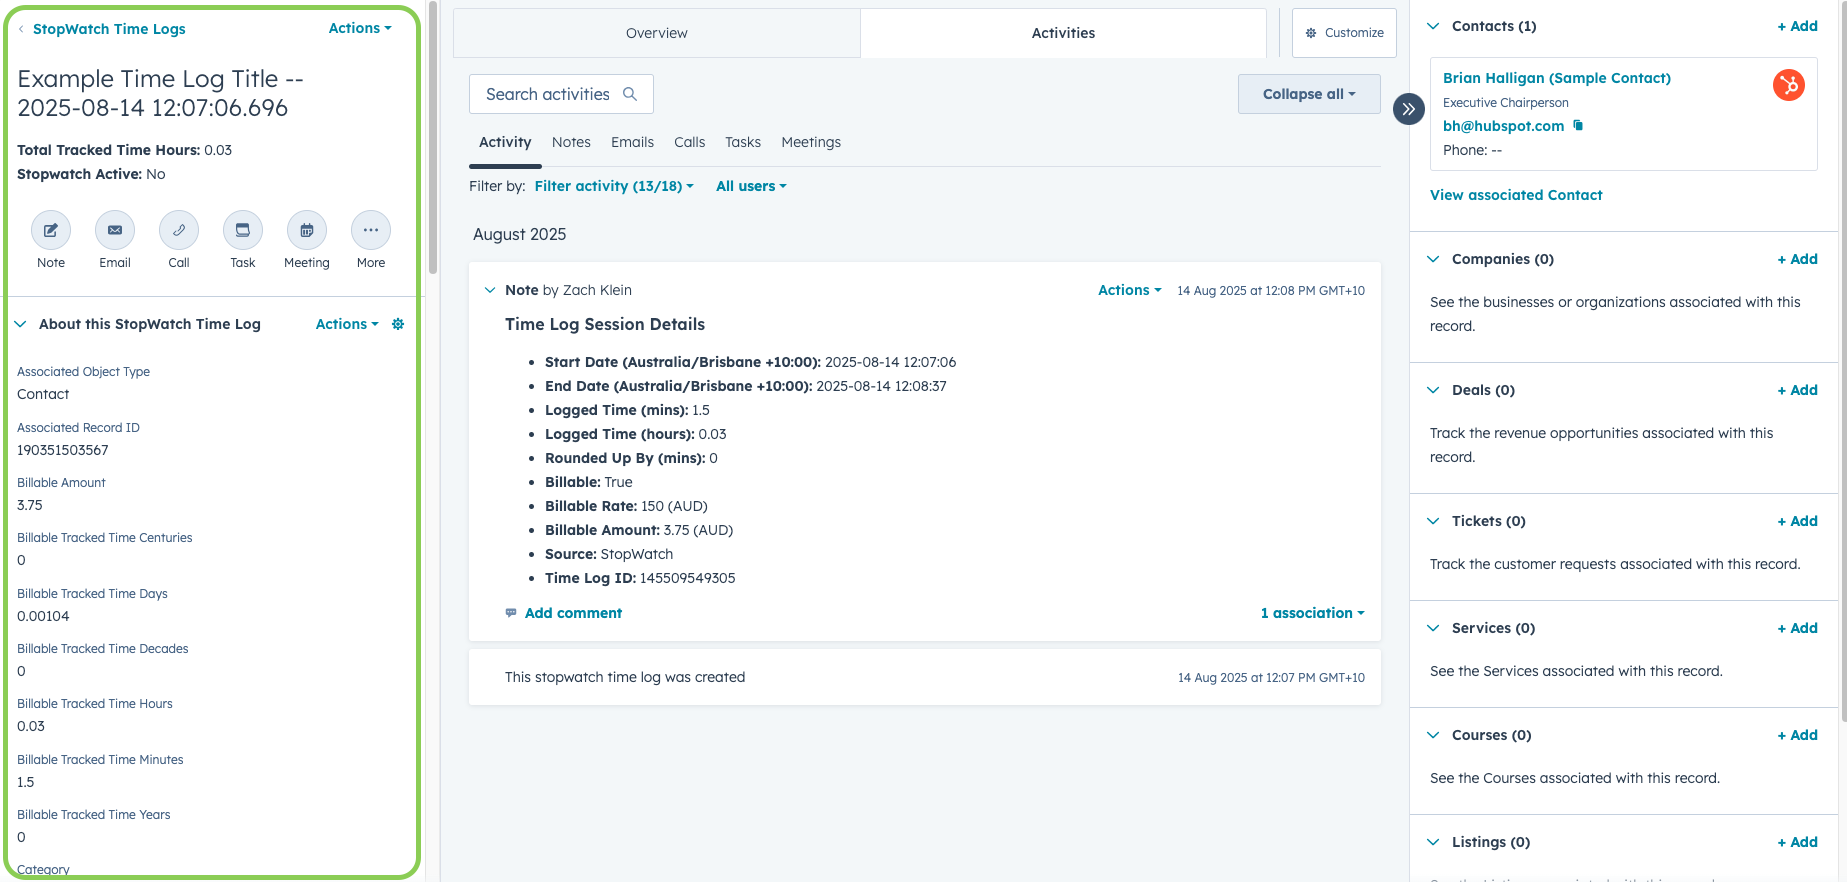
Each **Time Log** record contains data, reflecting a summary of all relevant time tracking sessions, with respect to the configured settings. This data is visible in the left sidebar on the Time Log record view (see screenshot below). The display of these properties can be customised within your HubSpot account settings.
 Information relating to each individual time tracking "session" can be viewed as **Notes** within the activity timeline of the relevant **Time Log** record (see image below).
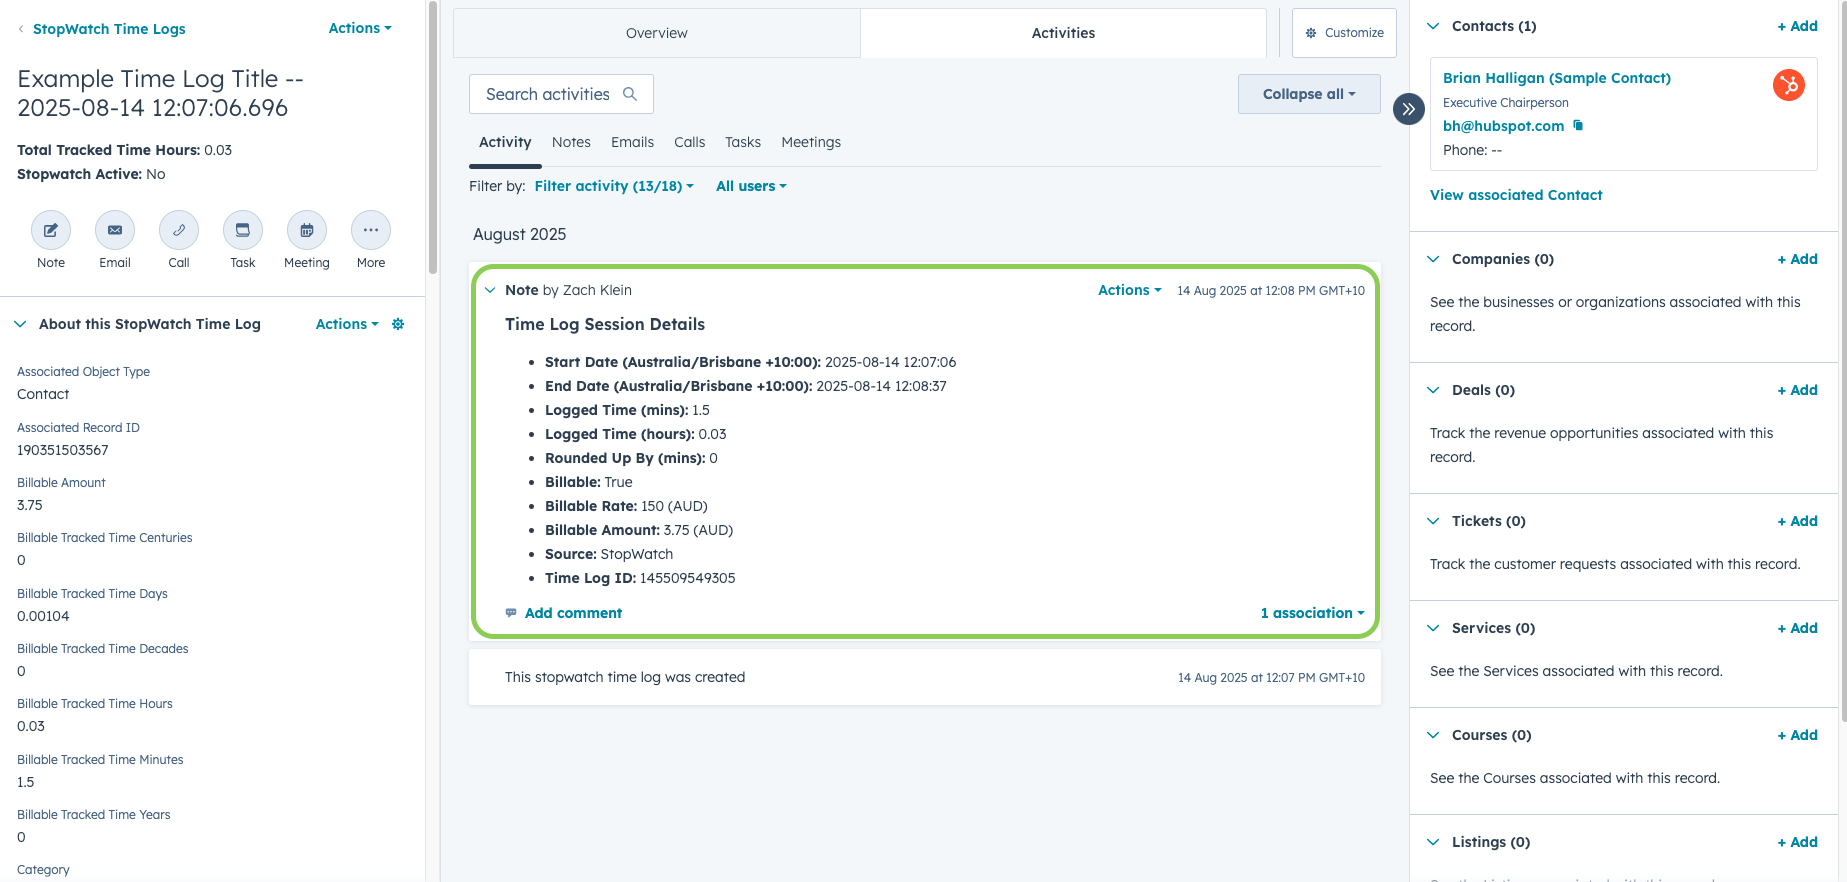 These **Notes** are standard HubSpot Engagement records, of "Note" type. They are automatically generated by **StopWatch for HubSpot** based on interaction with our App Cards and/or Custom Workflow Actions. If the app encounters an issue when creating these Notes, this is treated as a non-critical error. As such, it's possible that not all time tracking sessions will be represented as a **Note** in the Time Log activity timeline.
[Top of section](#time-logs)
[Top of page](#)
## 5. Timesheets
The **Timesheet** interface provides a weekly view of your relevant **Time Log** records, directly inside HubSpot.
These **Notes** are standard HubSpot Engagement records, of "Note" type. They are automatically generated by **StopWatch for HubSpot** based on interaction with our App Cards and/or Custom Workflow Actions. If the app encounters an issue when creating these Notes, this is treated as a non-critical error. As such, it's possible that not all time tracking sessions will be represented as a **Note** in the Time Log activity timeline.
[Top of section](#time-logs)
[Top of page](#)
## 5. Timesheets
The **Timesheet** interface provides a weekly view of your relevant **Time Log** records, directly inside HubSpot.
 * The **Timesheet** displays Time Logs created while either of the following user-specific settings were enabled: **1 Time Log Per Session** or **Split Time Logs By Week**.
* The **Timesheet** always represents one HubSpot user at a time
* **App Admins** and **Timesheet Managers** can view and edit any HubSpot User's Timesheet. Non-admin users can only view and edit their own Timesheet.
### Accessing the Timesheet
There are 3 ways to navigate to the **Timesheet** from within HubSpot:
Navigate to an individual HubSpot CRM record view where the **StopWatch** App Card is available.
Locate the **StopWatch** App Card on the record view.
Click **Tools** > **Timesheet**.
Click the **App Marketplace** icon (looks like ) in HubSpot's top navigation bar.
Navigate to **HubSpot Settings** > **Integrations** > **Connected Apps**.
Find the **StopWatch** row.
Click the **Actions** dropdown on the **StopWatch** row.
### Admin/Manager vs. User View
**App Admins** and **Timesheet Managers** can view/edit their own Timesheet, and can also select any other HubSpot user to view/edit that user's Timesheet.
Non-admin users can only view/edit their own Timesheet.
### Grid View & List View
The Timesheet supports 2 table layouts:
**Grid view**
* The **Timesheet** displays Time Logs created while either of the following user-specific settings were enabled: **1 Time Log Per Session** or **Split Time Logs By Week**.
* The **Timesheet** always represents one HubSpot user at a time
* **App Admins** and **Timesheet Managers** can view and edit any HubSpot User's Timesheet. Non-admin users can only view and edit their own Timesheet.
### Accessing the Timesheet
There are 3 ways to navigate to the **Timesheet** from within HubSpot:
Navigate to an individual HubSpot CRM record view where the **StopWatch** App Card is available.
Locate the **StopWatch** App Card on the record view.
Click **Tools** > **Timesheet**.
Click the **App Marketplace** icon (looks like ) in HubSpot's top navigation bar.
Navigate to **HubSpot Settings** > **Integrations** > **Connected Apps**.
Find the **StopWatch** row.
Click the **Actions** dropdown on the **StopWatch** row.
### Admin/Manager vs. User View
**App Admins** and **Timesheet Managers** can view/edit their own Timesheet, and can also select any other HubSpot user to view/edit that user's Timesheet.
Non-admin users can only view/edit their own Timesheet.
### Grid View & List View
The Timesheet supports 2 table layouts:
**Grid view**
Displays rows in a list format, with 1 column for each day in the selected week. Only one metric can be displayed at a time.
**List view**
Displays rows in a list format, with a dedicated **Date** column. Multiple metrics can be displayed.
### Weekly & Daily Views
By default, the Timesheet shows a weekly view. You can navigate between weeks using the arrow buttons near the date range, or use the date selector to jump to a specific week.
In **Grid view**, click a date column header to focus the Timesheet on that specific day. In **List view**, click a value in the **Date** column to do the same.
If a specific day has been selected, click **Week view** to return to the default weekly view.
### Grouped & Individual Logs
The Timesheet can display Time Logs in either of the following modes:
**Grouped**
Time Logs are grouped by the HubSpot CRM record that time has been tracked against
**Individual Logs**
Each Time Log is displayed as its own row
Grouped mode is useful for reviewing and editing total time tracked against a CRM record. Individual Logs mode is useful when you want to inspect or edit each Time Log individually.
### Tags, Filters & Search
The **Tags** column is intended to help you segment your Timesheet. Depending on the Time Log data, tags may include:
* CRM object type, such as **Deal**, **Company**, **Ticket** etc.
* Time Log Category
* Billable Service Name
* Whether the Time Log is **Billable**
* Whether the Time Log's timer is on
Use the **Filters** dropdown and/or **Search** input to constrain the displayed data accordingly.
If a timer is currently running for a Time Log, the Timesheet displays an **ON** status beside that Time Log's display title, and a **Timer On** tag in the Tags column.
### Metrics
The headline metrics at the top of the Timesheet can be customised. Available metrics include:
* **Total Time**
* **Billable Time**
* **Billable %**
* **Billable Amount**
* **Cost Amount**
* **Margin Amount**
* **Margin %**
You can optionally compare headline metrics against a previous period, such as the previous week, previous month, or previous year.
The metric(s) displayed in the results table can also be changed. In **Grid view**, one table metric is displayed at a time. In **List view**, you can select multiple table metrics.
### Capacity & Utilisation
The **available hours tracked this week** progress bar in the **Summary Statistics** section shows how much of a user's available time has been used in the selected week. This is calculated based on the **Weekly Capacity (Hours)** user-specific [app setting](/apps/stopwatch#app-settings).
### Submitting Time Tracking Sessions
To submit a new time tracking session, click the add button (looks like ) above the table. This opens a modal where you can input all relevant information relating to the time tracking session you'd like to record. First find the HubSpot CRM record you want to track time against, then input the relevant information, and then finally click **Submit Session**. Alternatively, in some cases, you may be able to simply click **Start Timer** to begin a time tracking session, rather than submitting a complete session.
### Editing Time Logs
To open an edit Time Log modal, click a Time Log title, or a clickable metric value.
If the selected value represents multiple Time Logs, you will be prompted to choose which Time Log you want to edit.
From the edit Time Log modal, you can navigate directly to the Time Log record view, update several Time Log properties, stop the timer (if it's running) and, depending on your install configuration, you may also be able to delete the Time Log record.
Time Logs with an active timer generally cannot be edited from the Timesheet. Use the **Stop Timer** button first before attempting to edit.
### Exporting Timesheet Data
Click the copy/export button (looks like ) above the table to copy the currently visible Timesheet table in **TSV format**. You can paste this directly into spreadsheet tools such as Google Sheets or Microsoft Excel.
Exported values are formatted for spreadsheet use:
* Duration values are converted to hours, such as **1.5** for 1 hour 30 minutes.
* Percentage values are converted to decimals, such as **0.9** for 90%.
* Currency values are exported as numbers, with the currency unit included in the column heading.
[Top of section](#timesheets)
[Top of page](#)
## 6. Web UI
* This feature is only available to our **💫 Unlimited** subscribers. Information about our subscription options is available on our [Pricing page](/pricing?app=stopwatch).
* To use this feature, specific users must first be nominated by a **StopWatch for HubSpot** admin. Admins can manage their **Web UI Users** via the **[admin app settings](#app-settings)**.
Log in to StopWatch for HubSpot's Web UI
Our **Web UI** allows your team to track time against HubSpot CRM records, without needing to log into HubSpot.
This is particularly useful for team members who aren't always at their desk, but still need to track their time. It's available via any web browser, so you can even track time on your phone.
 To access this feature, you'll need to login [here](https://stopwatch.threadi.au/login) (a link is sent to the supplied email address). You can also get there via the **"Web Login"** button on our [app homepage](https://stopwatch.threadi.au).
Once you're in, follow the prompts to find the HubSpot CRM record you're wanting to track time against, and then submit your time tracking session.
## 7. App Events
* This feature is available to **👥 Team** and **💫 Unlimited** subscribers only
* After enabling this feature, our **App Events** may not appear in your HubSpot Portal immediately. **Please allow up to 24 hours** for App Events and related features to become visible. If you don't see our App Events after this time, please submit a [support request](https://www.threadi.au/support?app_name=stopwatch).
**StopWatch for HubSpot** supports **App Events** for time tracking sessions. This is an optional feature, controlled via the **[Admin App Settings](#app-settings)**
When enabled, **App Events are logged within the relevant HubSpot CRM record’s activity timeline for each submitted time tracking session**. This makes it possible to build **HubSpot Workflows** and **Custom Reports** based on the submission of individual time tracking sessions.
To access this feature, you'll need to login [here](https://stopwatch.threadi.au/login) (a link is sent to the supplied email address). You can also get there via the **"Web Login"** button on our [app homepage](https://stopwatch.threadi.au).
Once you're in, follow the prompts to find the HubSpot CRM record you're wanting to track time against, and then submit your time tracking session.
## 7. App Events
* This feature is available to **👥 Team** and **💫 Unlimited** subscribers only
* After enabling this feature, our **App Events** may not appear in your HubSpot Portal immediately. **Please allow up to 24 hours** for App Events and related features to become visible. If you don't see our App Events after this time, please submit a [support request](https://www.threadi.au/support?app_name=stopwatch).
**StopWatch for HubSpot** supports **App Events** for time tracking sessions. This is an optional feature, controlled via the **[Admin App Settings](#app-settings)**
When enabled, **App Events are logged within the relevant HubSpot CRM record’s activity timeline for each submitted time tracking session**. This makes it possible to build **HubSpot Workflows** and **Custom Reports** based on the submission of individual time tracking sessions.
 By default, **App Events** are often hidden from the activity timeline. You must manually add them to the relevant activity timeline view by clicking **Activity** > **Integrations**. See the screenshot below for reference.
 This feature is available when tracking time against the HubSpot CRM object types listed below. All time tracking session submission sources are supported.
* **Contact**
* **Company**
* **Deal**
* **Ticket**
* **Project**
* **Appointment**
* **Course**
* **Listing**
* **Service**
## 8. Webhooks
This feature is:
* Only available to **💫 Unlimited** subscribers.
* Only relevant to customers using **App Objects Mode**. If you're using the legacy **Custom Objects Mode**, you can configure webhooks directly via native HubSpot features.
**StopWatch for HubSpot** supports **Webhook** subscriptions for time tracking sessions. This is an optional feature, controlled via the **[Admin App Settings](#app-settings)**
When enabled, webhook requests are sent to a specified target URL **when Time Logs are created and when time tracking sessions are submitted**. This makes it possible to build push-based integrations with external systems and build custom automation workflows.
**When a Time Log is created**, a webhook is triggered, sending a request to the configured target URL with a request body that follows the following structure:
#### Request Body
```json theme={null}
{
"eventId": 1122334455, // unique identifier for the webhook event
"subscriptionId": 123456789, // unique identifier for the webhook subscription that triggered the event
"portalId": 11111111, // unique identifier for the HubSpot Portal where the event occurred
"appId": 552213, // unique identifier for the app that triggered the event (i.e. StopWatch for HubSpot)
"occurredAt": 1781663476554, // unix timestamp in milliseconds representing when the event occurred
"subscriptionType": "object.creation", // type of event that triggered the webhook
"attemptNumber": 0, // number of attempts made to deliver the webhook (starts at 0 for the first attempt)
"objectId": 9988776655, // unique identifier for the Time Log record that triggered the event
"objectTypeId": "1-5233895", // unique identifier for the Time Log object type in HubSpot
"changeFlag": "CREATED", // type of change that occurred to trigger the event
"changeSource": "INTEGRATION", // source of the change that triggered the event
"sourceId": "552213" // unique identifier for the source of the change
}
```
**When a time tracking session is submitted**, a webhook is triggered, sending a request to the configured target URL with a request body that follows the following structure:
#### Request Body
```json theme={null}
{
"eventId": 1122334455, // unique identifier for the webhook event
"subscriptionId": 123456789, // unique identifier for the webhook subscription that triggered the event
"portalId": 11111111, // unique identifier for the HubSpot Portal where the event occurred
"appId": 552213, // unique identifier for the app that triggered the event (i.e. StopWatch for HubSpot)
"occurredAt": 1781662300785, // unix timestamp in milliseconds representing when the event occurred
"subscriptionType": "object.propertyChange", // type of event that triggered the webhook
"attemptNumber": 0, // number of attempts made to deliver the webhook (starts at 0 for the first attempt)
"objectId": 9988776655, // unique identifier for the Time Log record that triggered the event
"objectTypeId": "1-5233895", // unique identifier for the Time Log object type in HubSpot
"propertyName": "a552213_last_end_date", // name of the Time Log property that was changed
"propertyValue": "1781662297005", // new value of the changed property
"changeSource": "INTEGRATION", // source of the change that triggered the event
"sourceId": "552213", // unique identifier for the source of the change
"isSensitive": false // indicates whether the changed property contains sensitive information
}
```
**When a Time Log is deleted**, a webhook is triggered, sending a request to the configured target URL with a request body that follows the following structure:
#### Request Body
```json theme={null}
{
"eventId": 1122334455, // unique identifier for the webhook event
"subscriptionId": 123456789, // unique identifier for the webhook subscription that triggered the event
"portalId": 11111111, // unique identifier for the HubSpot Portal where the event occurred
"appId": 552213, // unique identifier for the app that triggered the event (i.e. StopWatch for HubSpot)
"occurredAt": 1781663476554, // unix timestamp in milliseconds representing when the event occurred
"subscriptionType": "object.deletion", // type of event that triggered the webhook
"attemptNumber": 0, // number of attempts made to deliver the webhook (starts at 0 for the first attempt)
"objectId": 9988776655, // unique identifier for the Time Log record that triggered the event
"objectTypeId": "1-5233895", // unique identifier for the Time Log object type in HubSpot
"changeFlag": "DELETED", // type of change that occurred to trigger the event
"changeSource": "INTEGRATION", // source of the change that triggered the event
"sourceId": "552213" // unique identifier for the source of the change
}
```
**Return a `2xx` response code** from your server **within 15 seconds** to acknowledge successful receipt of the webhook request
### Validating webhook requests
When you enable the **Webhooks** setting, you'll be allocated a request **Signing Secret**. This secret can be used to verify that incoming webhook requests were sent by **StopWatch for HubSpot**.
Each webhook request includes headers you can use to verify that the request came from **StopWatch for HubSpot**:
* **`X-StopWatch-Signature`** e.g. v1=abc123
* **`X-StopWatch-Timestamp`** e.g. 1781663476554
* **`X-StopWatch-Webhook-Id`** e.g. 1122334455-0
Read the raw request body exactly as received. Do not parse the body as JSON or in any other way before using it to calculate the signature.
Check the `X-StopWatch-Timestamp` header to ensure the request is recent. Reject the request if the timestamp is more than 5 minutes old to prevent replay attacks.
Create an HMAC-SHA256 signature using your Webhook Signing Secret and the raw request body. The signature should be in the format: `v1={hexdigest}`, where `{hexdigest}` is the hexadecimal representation of the HMAC-SHA256 digest.
Compare your calculated signature with the value in the `X-StopWatch-Signature` header. Use a constant-time comparison method to prevent timing attacks.
If the signatures do not match, reject the request with an appropriate HTTP status code (e.g. 401 Unauthorized).
```python Example Webhook Request Validation theme={null}
import hmac
import hashlib
import time
from flask import Flask, request, abort
SECRET = "{{your_webhook_signing_secret}}"
def validate_stopwatch_webhook(headers, raw_body: bytes) -> bool:
signature_header = headers.get("X-StopWatch-Signature", "")
timestamp_header = headers.get("X-StopWatch-Timestamp", "")
if not signature_header.startswith("v1="):
return False
try:
timestamp_ms = int(timestamp_header)
except ValueError:
return False
# Reject requests older than 5 minutes.
now_ms = int(time.time() * 1000)
if abs(now_ms - timestamp_ms) > 5 * 60 * 1000:
return False
received_signature = signature_header.removeprefix("v1=")
# Use the exact raw request body bytes, not parsed JSON.
expected_signature = hmac.new(
SECRET.encode("utf-8"),
raw_body,
hashlib.sha256,
).hexdigest()
return hmac.compare_digest(expected_signature, received_signature)
app = Flask(__name__)
# Example endpoint to receive StopWatch for HubSpot webhooks
@app.post("/catch-stopwatch-webhook")
def catch_stopwatch_webhook():
raw_body = request.get_data()
if not validate_stopwatch_webhook(request.headers, raw_body):
abort(401)
event = request.get_json()
# Process event here.
return {"ok": True}, 200
```
## 9. Suppress Time Log Ownership Notifications
Each **Time Log** record created via interaction with the **StopWatch** App Card is automatically assigned a HubSpot "Owner", reflecting the HubSpot user who is tracking the time. This is also the case for **Time Logs** created via the app's Custom Workflow Actions that are not designated as **Workflow-Managed**.
The inclusion of this feature within **StopWatch for HubSpot** is designed to allow for more powerful reporting and automation when working with **Time Log** records.
Among other benefits, record ownership of Time Logs allows for:
1. Dynamic filtering within reports, and
2. Subsequent record ownership assignment within workflows
By default, if a record of any object type is assigned an Owner, the relevant HubSpot user is sent an email notification, alerting them to their ownership of the record.
This email notification can be managed by users within HubSpot's settings:
Open your HubSpot account and click the icon in the top navigation bar.
Via the left sidebar, navigate to 'Your Preferences' > 'Notifications'
Locate 'Custom Objects' in the centre panel within the 'Email & Desktop' tab. Disable the email notification relating to 'Custom object assigned to you'.
This feature is available when tracking time against the HubSpot CRM object types listed below. All time tracking session submission sources are supported.
* **Contact**
* **Company**
* **Deal**
* **Ticket**
* **Project**
* **Appointment**
* **Course**
* **Listing**
* **Service**
## 8. Webhooks
This feature is:
* Only available to **💫 Unlimited** subscribers.
* Only relevant to customers using **App Objects Mode**. If you're using the legacy **Custom Objects Mode**, you can configure webhooks directly via native HubSpot features.
**StopWatch for HubSpot** supports **Webhook** subscriptions for time tracking sessions. This is an optional feature, controlled via the **[Admin App Settings](#app-settings)**
When enabled, webhook requests are sent to a specified target URL **when Time Logs are created and when time tracking sessions are submitted**. This makes it possible to build push-based integrations with external systems and build custom automation workflows.
**When a Time Log is created**, a webhook is triggered, sending a request to the configured target URL with a request body that follows the following structure:
#### Request Body
```json theme={null}
{
"eventId": 1122334455, // unique identifier for the webhook event
"subscriptionId": 123456789, // unique identifier for the webhook subscription that triggered the event
"portalId": 11111111, // unique identifier for the HubSpot Portal where the event occurred
"appId": 552213, // unique identifier for the app that triggered the event (i.e. StopWatch for HubSpot)
"occurredAt": 1781663476554, // unix timestamp in milliseconds representing when the event occurred
"subscriptionType": "object.creation", // type of event that triggered the webhook
"attemptNumber": 0, // number of attempts made to deliver the webhook (starts at 0 for the first attempt)
"objectId": 9988776655, // unique identifier for the Time Log record that triggered the event
"objectTypeId": "1-5233895", // unique identifier for the Time Log object type in HubSpot
"changeFlag": "CREATED", // type of change that occurred to trigger the event
"changeSource": "INTEGRATION", // source of the change that triggered the event
"sourceId": "552213" // unique identifier for the source of the change
}
```
**When a time tracking session is submitted**, a webhook is triggered, sending a request to the configured target URL with a request body that follows the following structure:
#### Request Body
```json theme={null}
{
"eventId": 1122334455, // unique identifier for the webhook event
"subscriptionId": 123456789, // unique identifier for the webhook subscription that triggered the event
"portalId": 11111111, // unique identifier for the HubSpot Portal where the event occurred
"appId": 552213, // unique identifier for the app that triggered the event (i.e. StopWatch for HubSpot)
"occurredAt": 1781662300785, // unix timestamp in milliseconds representing when the event occurred
"subscriptionType": "object.propertyChange", // type of event that triggered the webhook
"attemptNumber": 0, // number of attempts made to deliver the webhook (starts at 0 for the first attempt)
"objectId": 9988776655, // unique identifier for the Time Log record that triggered the event
"objectTypeId": "1-5233895", // unique identifier for the Time Log object type in HubSpot
"propertyName": "a552213_last_end_date", // name of the Time Log property that was changed
"propertyValue": "1781662297005", // new value of the changed property
"changeSource": "INTEGRATION", // source of the change that triggered the event
"sourceId": "552213", // unique identifier for the source of the change
"isSensitive": false // indicates whether the changed property contains sensitive information
}
```
**When a Time Log is deleted**, a webhook is triggered, sending a request to the configured target URL with a request body that follows the following structure:
#### Request Body
```json theme={null}
{
"eventId": 1122334455, // unique identifier for the webhook event
"subscriptionId": 123456789, // unique identifier for the webhook subscription that triggered the event
"portalId": 11111111, // unique identifier for the HubSpot Portal where the event occurred
"appId": 552213, // unique identifier for the app that triggered the event (i.e. StopWatch for HubSpot)
"occurredAt": 1781663476554, // unix timestamp in milliseconds representing when the event occurred
"subscriptionType": "object.deletion", // type of event that triggered the webhook
"attemptNumber": 0, // number of attempts made to deliver the webhook (starts at 0 for the first attempt)
"objectId": 9988776655, // unique identifier for the Time Log record that triggered the event
"objectTypeId": "1-5233895", // unique identifier for the Time Log object type in HubSpot
"changeFlag": "DELETED", // type of change that occurred to trigger the event
"changeSource": "INTEGRATION", // source of the change that triggered the event
"sourceId": "552213" // unique identifier for the source of the change
}
```
**Return a `2xx` response code** from your server **within 15 seconds** to acknowledge successful receipt of the webhook request
### Validating webhook requests
When you enable the **Webhooks** setting, you'll be allocated a request **Signing Secret**. This secret can be used to verify that incoming webhook requests were sent by **StopWatch for HubSpot**.
Each webhook request includes headers you can use to verify that the request came from **StopWatch for HubSpot**:
* **`X-StopWatch-Signature`** e.g. v1=abc123
* **`X-StopWatch-Timestamp`** e.g. 1781663476554
* **`X-StopWatch-Webhook-Id`** e.g. 1122334455-0
Read the raw request body exactly as received. Do not parse the body as JSON or in any other way before using it to calculate the signature.
Check the `X-StopWatch-Timestamp` header to ensure the request is recent. Reject the request if the timestamp is more than 5 minutes old to prevent replay attacks.
Create an HMAC-SHA256 signature using your Webhook Signing Secret and the raw request body. The signature should be in the format: `v1={hexdigest}`, where `{hexdigest}` is the hexadecimal representation of the HMAC-SHA256 digest.
Compare your calculated signature with the value in the `X-StopWatch-Signature` header. Use a constant-time comparison method to prevent timing attacks.
If the signatures do not match, reject the request with an appropriate HTTP status code (e.g. 401 Unauthorized).
```python Example Webhook Request Validation theme={null}
import hmac
import hashlib
import time
from flask import Flask, request, abort
SECRET = "{{your_webhook_signing_secret}}"
def validate_stopwatch_webhook(headers, raw_body: bytes) -> bool:
signature_header = headers.get("X-StopWatch-Signature", "")
timestamp_header = headers.get("X-StopWatch-Timestamp", "")
if not signature_header.startswith("v1="):
return False
try:
timestamp_ms = int(timestamp_header)
except ValueError:
return False
# Reject requests older than 5 minutes.
now_ms = int(time.time() * 1000)
if abs(now_ms - timestamp_ms) > 5 * 60 * 1000:
return False
received_signature = signature_header.removeprefix("v1=")
# Use the exact raw request body bytes, not parsed JSON.
expected_signature = hmac.new(
SECRET.encode("utf-8"),
raw_body,
hashlib.sha256,
).hexdigest()
return hmac.compare_digest(expected_signature, received_signature)
app = Flask(__name__)
# Example endpoint to receive StopWatch for HubSpot webhooks
@app.post("/catch-stopwatch-webhook")
def catch_stopwatch_webhook():
raw_body = request.get_data()
if not validate_stopwatch_webhook(request.headers, raw_body):
abort(401)
event = request.get_json()
# Process event here.
return {"ok": True}, 200
```
## 9. Suppress Time Log Ownership Notifications
Each **Time Log** record created via interaction with the **StopWatch** App Card is automatically assigned a HubSpot "Owner", reflecting the HubSpot user who is tracking the time. This is also the case for **Time Logs** created via the app's Custom Workflow Actions that are not designated as **Workflow-Managed**.
The inclusion of this feature within **StopWatch for HubSpot** is designed to allow for more powerful reporting and automation when working with **Time Log** records.
Among other benefits, record ownership of Time Logs allows for:
1. Dynamic filtering within reports, and
2. Subsequent record ownership assignment within workflows
By default, if a record of any object type is assigned an Owner, the relevant HubSpot user is sent an email notification, alerting them to their ownership of the record.
This email notification can be managed by users within HubSpot's settings:
Open your HubSpot account and click the icon in the top navigation bar.
Via the left sidebar, navigate to 'Your Preferences' > 'Notifications'
Locate 'Custom Objects' in the centre panel within the 'Email & Desktop' tab. Disable the email notification relating to 'Custom object assigned to you'.
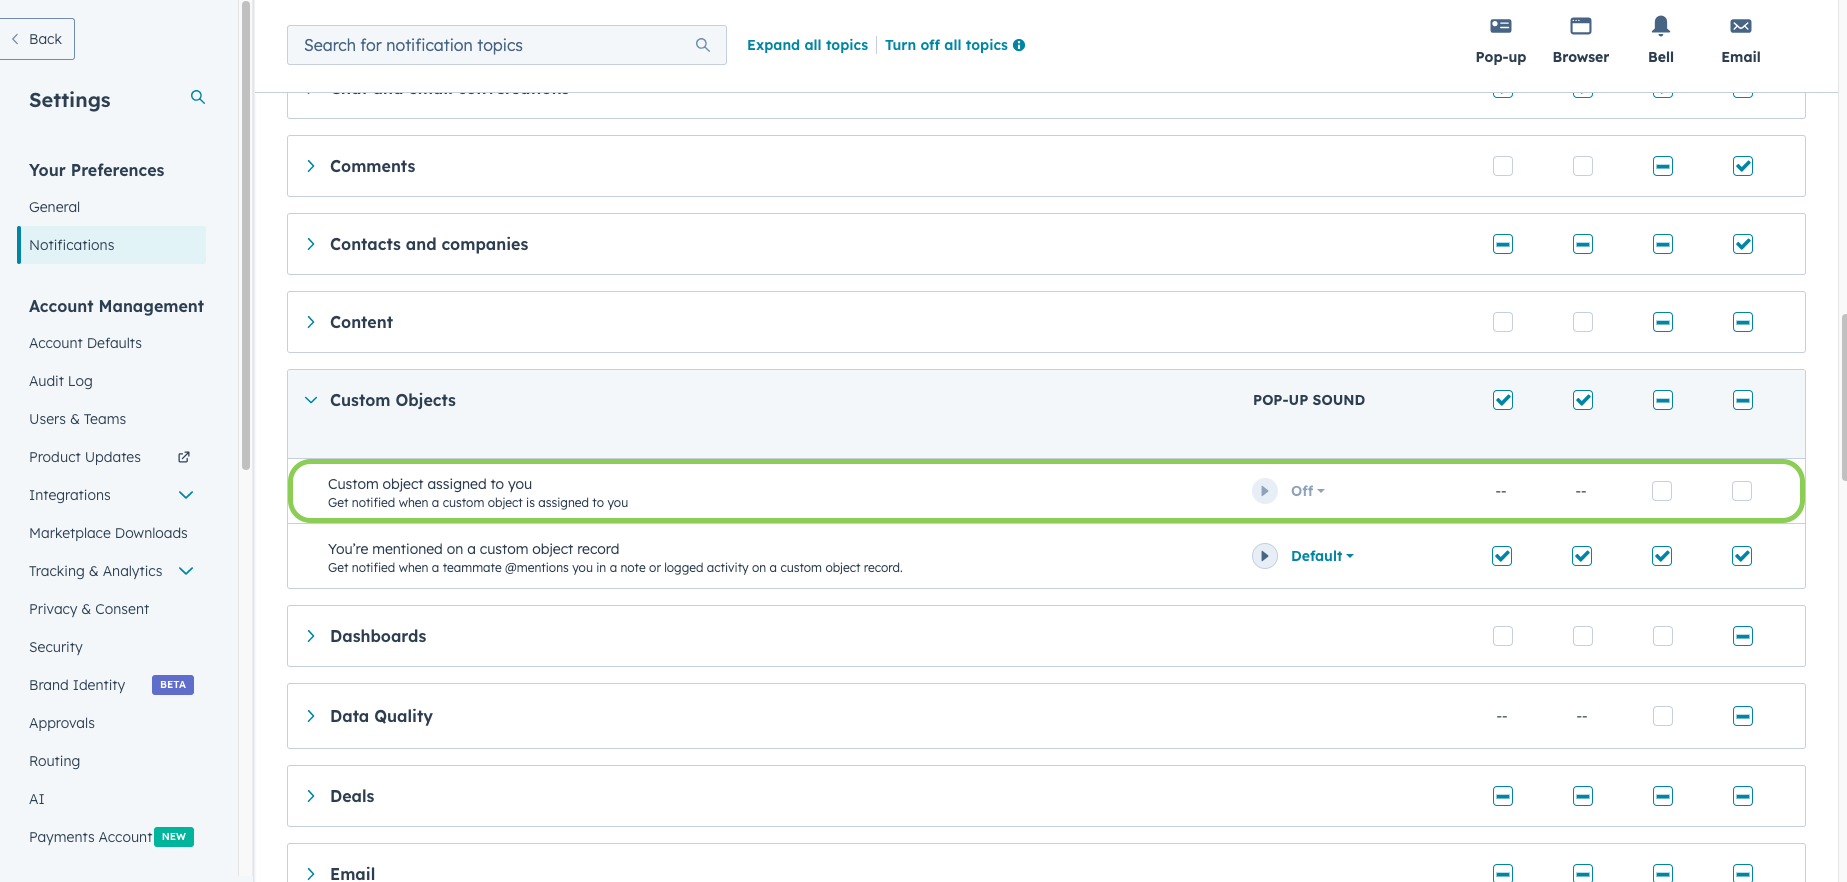 Unfortunately, this notification can only be managed collectively across all custom objects within a HubSpot account (i.e. it's not possible to manage this notification granularly, per custom object type). Rather than turning them off in HubSpot, alternatively you could consider configuring your email inbox filters / settings to more selectively "hide" or "delete" these notification emails.
[Top of section](#suppressing-time-log-ownership-notifications)
[Top of page](#)
## 10. Reporting and Automation
HubSpot [Custom Reports](https://knowledge.hubspot.com/reports/create-custom-reports) and [Workflows](https://knowledge.hubspot.com/workflows/create-workflows) are restricted to certain HubSpot subscription levels. Please review the previously linked HubSpot Knowledge Base Articles to confirm whether you have access to these features.
Once you have collected some time tracking data in your HubSpot account (in the format of **Time Log** records), you're likely going to want to extract some value from it.
### Custom Reports
You can use your **Time Logs** as you would any other CRM object type within your HubSpot account. With your **Time Logs** as the centrepiece, we recommend creating or updating your existing HubSpot reports/dashboards to better understand how your team is collectively spending their time across Deals, Contact, Companies, Tickets, Appointments, Courses, Listings, Services and/or Projects.
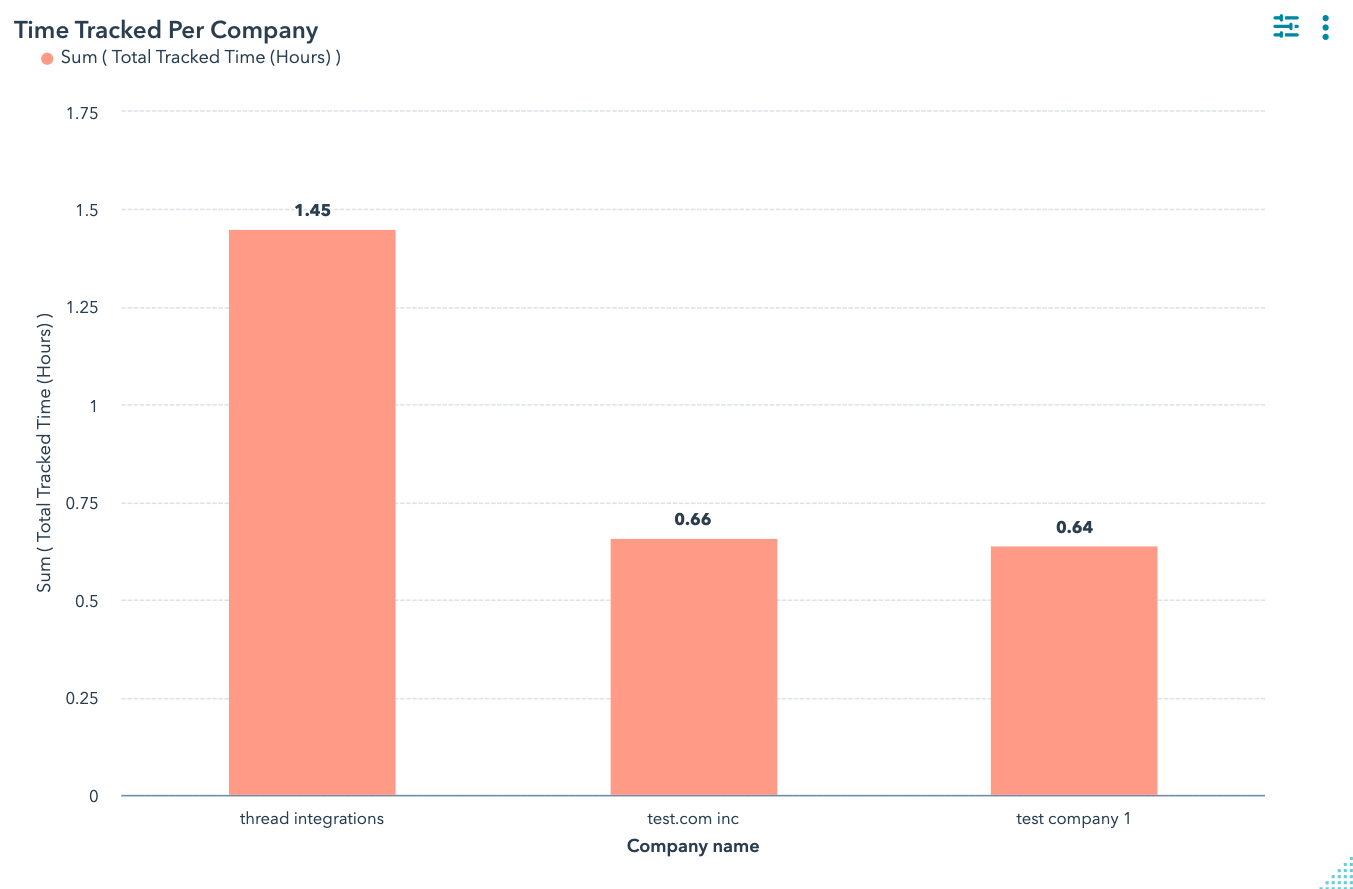
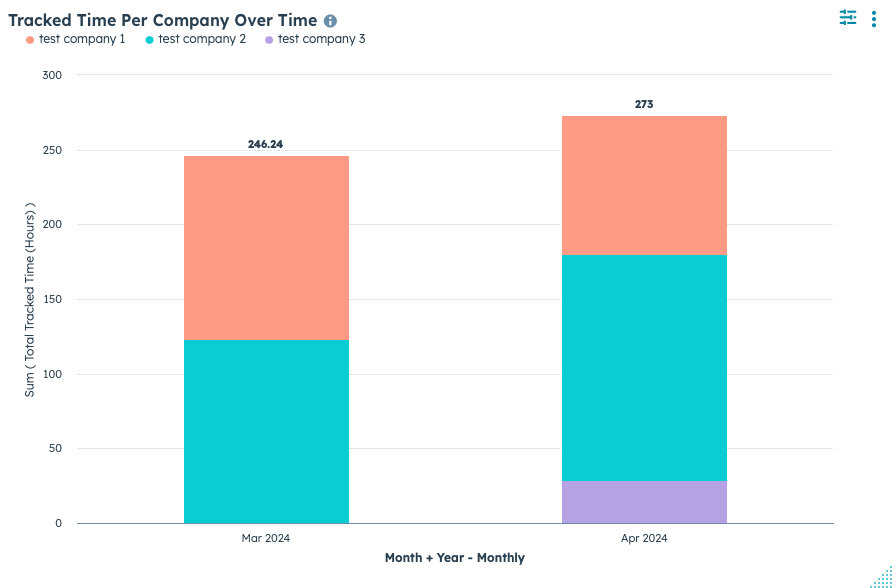
To help get the ball rolling, below are a couple of screenshots of example HubSpot reports leveraging data made available by **StopWatch for HubSpot**.
Unfortunately, this notification can only be managed collectively across all custom objects within a HubSpot account (i.e. it's not possible to manage this notification granularly, per custom object type). Rather than turning them off in HubSpot, alternatively you could consider configuring your email inbox filters / settings to more selectively "hide" or "delete" these notification emails.
[Top of section](#suppressing-time-log-ownership-notifications)
[Top of page](#)
## 10. Reporting and Automation
HubSpot [Custom Reports](https://knowledge.hubspot.com/reports/create-custom-reports) and [Workflows](https://knowledge.hubspot.com/workflows/create-workflows) are restricted to certain HubSpot subscription levels. Please review the previously linked HubSpot Knowledge Base Articles to confirm whether you have access to these features.
Once you have collected some time tracking data in your HubSpot account (in the format of **Time Log** records), you're likely going to want to extract some value from it.
### Custom Reports
You can use your **Time Logs** as you would any other CRM object type within your HubSpot account. With your **Time Logs** as the centrepiece, we recommend creating or updating your existing HubSpot reports/dashboards to better understand how your team is collectively spending their time across Deals, Contact, Companies, Tickets, Appointments, Courses, Listings, Services and/or Projects.
To help get the ball rolling, below are a couple of screenshots of example HubSpot reports leveraging data made available by **StopWatch for HubSpot**.
 ### Automation Workflows
#### Custom Workflow Actions
This feature is available to **💫 Unlimited** subscribers only
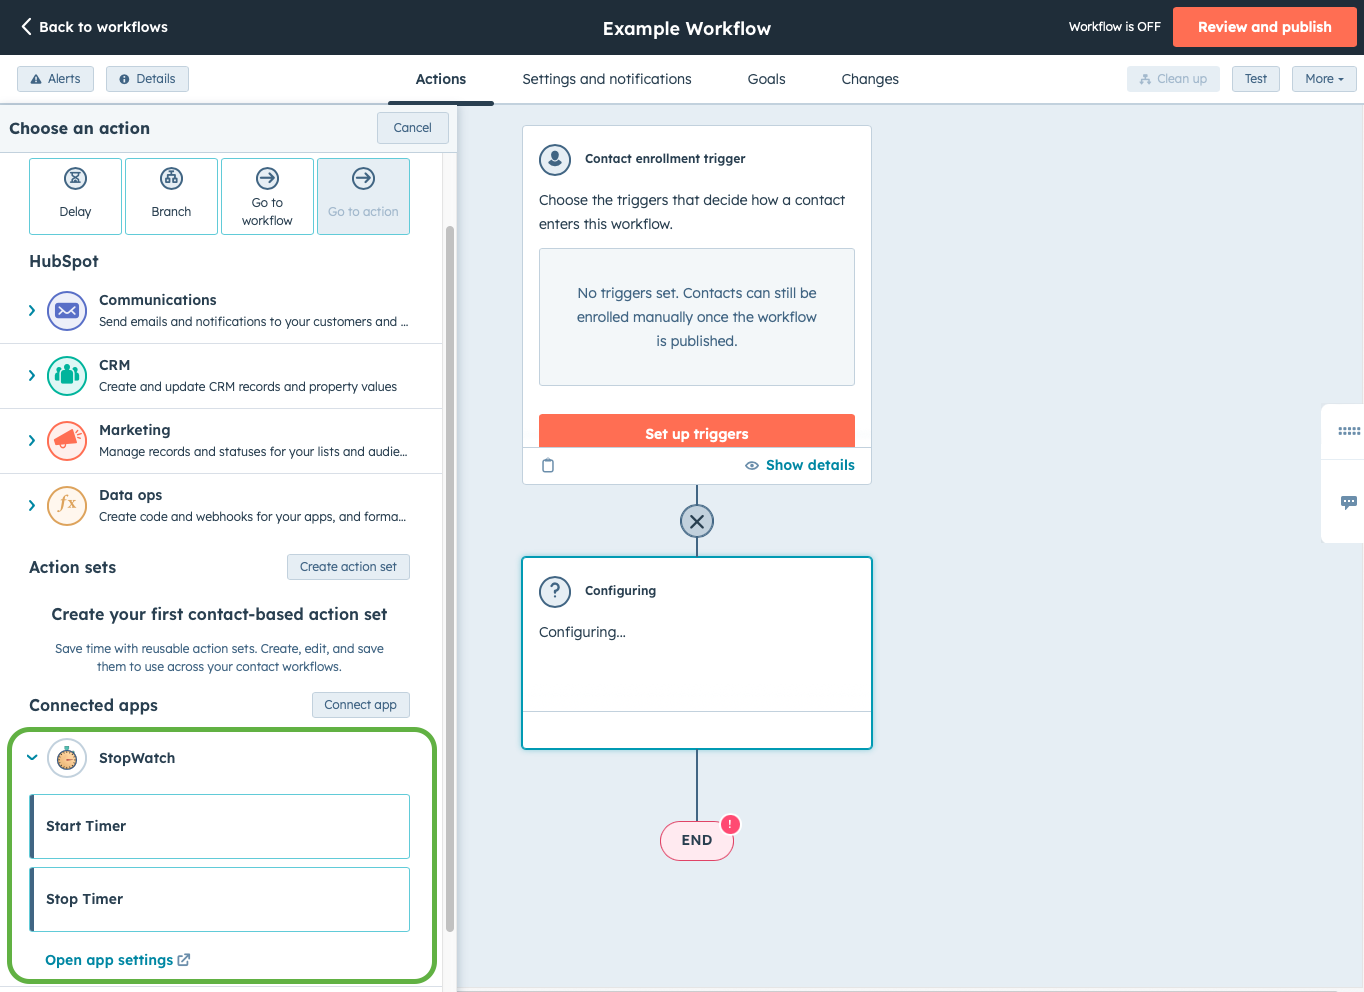
**💫 Unlimited** subscribers have access to 3 custom workflow actions provided by **StopWatch for HubSpot**. There's a daily usage cap of 1,000 custom workflow action requests per day. Any requests made over this usage cap will be rejected by the app.
The great majority of requests will be processed within 5 minutes of being received. If you require more requests per day or faster processing times, please submit a [support request](https://www.threadi.au/support?app_name=stopwatch).
| Title | Detail |
| ----------------------------------- | --------------------------------------------------------------------------------------------------------------------------------------------------------------------------------------------------------------------------------------------------------------------------------------------------------------------------------------------------------------------------------------------------------------------------------------------------------------------------------------------------------------------------------------------------------------------------------------------------------------------------------------------------------------------------------------------------------------------------------------------------------------------------------------------------------- |
| **Start Timer** | This custom workflow action starts a *StopWatch for HubSpot* Timer, relevant to the record enrolled in the given workflow. The "Start Timer" action includes an option to tag a Time Log as being *'Workflow-Managed'*. As a general rule, you should use this feature when the time being tracked does not directly relate to the Owner of the given CRM record. |
| **Stop Timer** | This custom workflow action stops a *StopWatch for HubSpot* Timer, relevant to the record enrolled in the given workflow. If you've tagged the corresponding "Start Timer" action as being *'Workflow-Managed'*, be sure to use the exact same tag within the "Stop Timer" action. Failure to do so could lead to errors relating to the app not being able to find the corresponding Time Log. The "Stop Timer" action also includes an option to exclude out of office hours, with configurable settings including the ability to specify your timezone and the start/end hours of your standard work day. This allows for the support of common sales and service time tracking use cases involving the analysis of how long CRM records spend in a given stage/status, excluding out of office hours. |
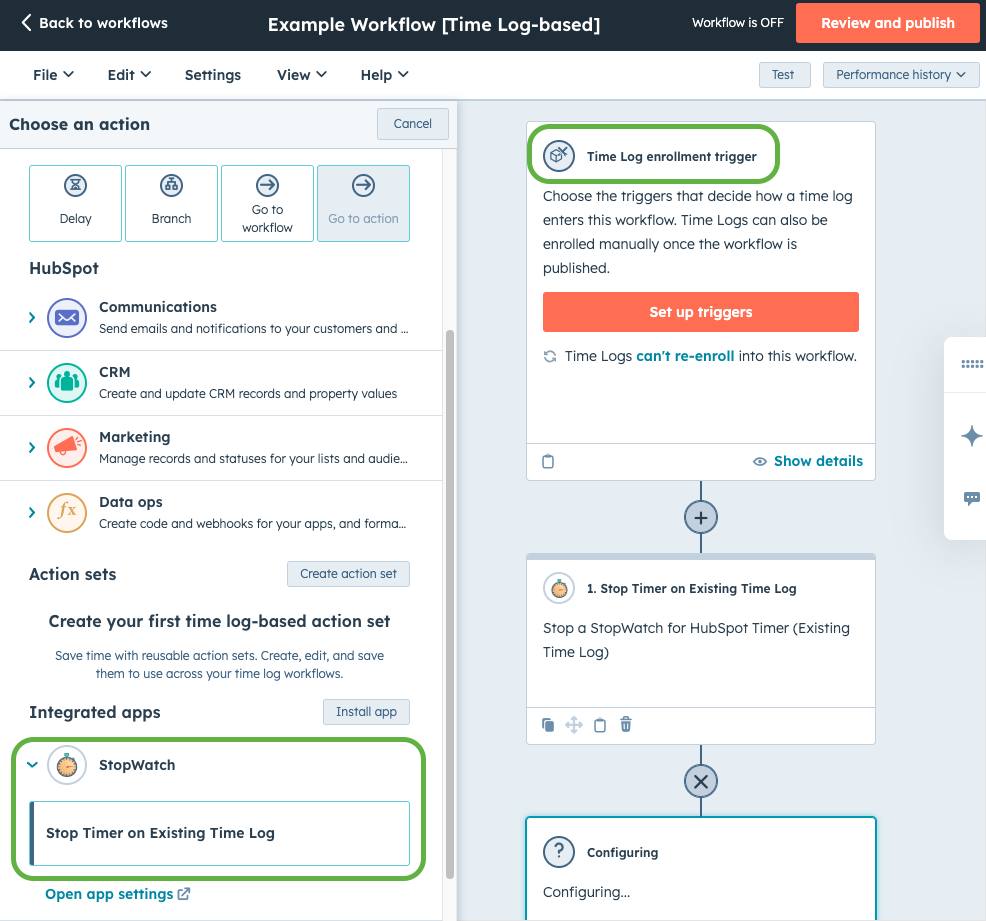
| **Stop Timer on Existing Time Log** | **\[Time Log-based Workflows Only]** This custom workflow action stops the *StopWatch for HubSpot* Timer directly on the Time Log enrolled in the given workflow. Please note, for installs using the app in the legacy **Custom Objects mode**, this feature can only be made available on a case-by-case basis. If you'd like to request access, please submit a [support request](https://www.threadi.au/support) |
These custom workflow actions come with settings that offer far greater time tracking flexibility, in comparison to using the **StopWatch** App Card feature alone. For example, it's possible to configure workflows that track the time an individual record spends within a given object stage (e.g. Deal Stage, Contact Lifecycle Stage, Ticket Status, Listing Stage, Service Stage), excluding out of office hours.
### Automation Workflows
#### Custom Workflow Actions
This feature is available to **💫 Unlimited** subscribers only
**💫 Unlimited** subscribers have access to 3 custom workflow actions provided by **StopWatch for HubSpot**. There's a daily usage cap of 1,000 custom workflow action requests per day. Any requests made over this usage cap will be rejected by the app.
The great majority of requests will be processed within 5 minutes of being received. If you require more requests per day or faster processing times, please submit a [support request](https://www.threadi.au/support?app_name=stopwatch).
| Title | Detail |
| ----------------------------------- | --------------------------------------------------------------------------------------------------------------------------------------------------------------------------------------------------------------------------------------------------------------------------------------------------------------------------------------------------------------------------------------------------------------------------------------------------------------------------------------------------------------------------------------------------------------------------------------------------------------------------------------------------------------------------------------------------------------------------------------------------------------------------------------------------------- |
| **Start Timer** | This custom workflow action starts a *StopWatch for HubSpot* Timer, relevant to the record enrolled in the given workflow. The "Start Timer" action includes an option to tag a Time Log as being *'Workflow-Managed'*. As a general rule, you should use this feature when the time being tracked does not directly relate to the Owner of the given CRM record. |
| **Stop Timer** | This custom workflow action stops a *StopWatch for HubSpot* Timer, relevant to the record enrolled in the given workflow. If you've tagged the corresponding "Start Timer" action as being *'Workflow-Managed'*, be sure to use the exact same tag within the "Stop Timer" action. Failure to do so could lead to errors relating to the app not being able to find the corresponding Time Log. The "Stop Timer" action also includes an option to exclude out of office hours, with configurable settings including the ability to specify your timezone and the start/end hours of your standard work day. This allows for the support of common sales and service time tracking use cases involving the analysis of how long CRM records spend in a given stage/status, excluding out of office hours. |
| **Stop Timer on Existing Time Log** | **\[Time Log-based Workflows Only]** This custom workflow action stops the *StopWatch for HubSpot* Timer directly on the Time Log enrolled in the given workflow. Please note, for installs using the app in the legacy **Custom Objects mode**, this feature can only be made available on a case-by-case basis. If you'd like to request access, please submit a [support request](https://www.threadi.au/support) |
These custom workflow actions come with settings that offer far greater time tracking flexibility, in comparison to using the **StopWatch** App Card feature alone. For example, it's possible to configure workflows that track the time an individual record spends within a given object stage (e.g. Deal Stage, Contact Lifecycle Stage, Ticket Status, Listing Stage, Service Stage), excluding out of office hours.

 To learn more about how to use your **Time Logs** in HubSpot's [custom reporting](https://knowledge.hubspot.com/reports/create-custom-reports) and [automation tools](https://knowledge.hubspot.com/workflows/create-workflows), please review the previously linked HubSpot Knowledge Base Articles.
[Top of section](#reporting-and-automation)
[Top of page](#)
## 11. App Settings
**StopWatch for HubSpot** comes with a number of settings, configurable from within HubSpot.
#### User-Specific Settings
By default, user-specific settings can be configured by anyone with **App Marketplace Access** permissions.
* Admins can edit the settings of all users
* Non-admins can only edit their own user-specific settings
Admins can control which non-admins are able to adjust user-specific settings via the **Lockdown User Settings** feature.
#### Account-Specific Settings
Only admins can edit the account-specific settings.
To learn more about how to use your **Time Logs** in HubSpot's [custom reporting](https://knowledge.hubspot.com/reports/create-custom-reports) and [automation tools](https://knowledge.hubspot.com/workflows/create-workflows), please review the previously linked HubSpot Knowledge Base Articles.
[Top of section](#reporting-and-automation)
[Top of page](#)
## 11. App Settings
**StopWatch for HubSpot** comes with a number of settings, configurable from within HubSpot.
#### User-Specific Settings
By default, user-specific settings can be configured by anyone with **App Marketplace Access** permissions.
* Admins can edit the settings of all users
* Non-admins can only edit their own user-specific settings
Admins can control which non-admins are able to adjust user-specific settings via the **Lockdown User Settings** feature.
#### Account-Specific Settings
Only admins can edit the account-specific settings.
To access **StopWatch for HubSpot** settings:
Open your HubSpot account and click the icon in the top navigation bar.
Via the left sidebar, navigate to Account Management > Integrations > Connected Apps
From the list of apps connected to your HubSpot account, find and click **StopWatch**. Then click through to the **Settings** tab.
Please refer to the below table for an explanation of all the account-specific settings available within the "Admin Settings" tab.
| Setting | Default | Description |
| ----------------------------------------- | --------------------------------------------------------------- | -------------------------------------------------------------------------------------------------------------------------------------------------------------------------------------------------------------------------------------------------------------------------------------------------------------------------------------------------------------------------------------------------------------------------------------- |
| **Nominated Users** | Primary Admin | Only visible to our **🤗 Free** subscribers. A list of up to 3 nominated users with access to app features. User rotation is not supported. Once you successfully nominate 3 users, you will not be able to make further changes. |
| **Web UI Users** | None | Only available to our **💫 Unlimited** subscribers. A list of nominated users with access to our [Web UI feature](#web-ui). |
| **StopWatch API Key** | None | Manage your [**StopWatch API**](/apis/stopwatch) authentication token. Only available to our **💫 Unlimited** subscribers and only visible to **Primary Admins**. |
| **Webhooks** | OFF | Subscribe to Time Log creation and time tracking session submission webhook events. |
| **Lockdown User Settings** | OFF | If enabled, prevents non-admins from modifying their own user-specific settings. |
| **Lockdown User Settings Exceptions** | None | Indicates which users should be exempt from the 'Lockdown User Settings' restriction (described above). This gives specific non-admins the ability to modify their own user-specific settings, while preventing all other non-admins from doing so. Only available if 'Lockdown User Settings' is enabled. |
| **Auto Start Override** | OFF | When enabled, the **Auto Start Timer** feature is engaged whenever a user loads a CRM record view containing the StopWatch App Card, provided the timer was last stopped more than 1 minute ago. This removes the default requirement for a prior time tracking session to have been logged against the given CRM record. This makes it possible to use the **Auto Start Timer** and **1 Time Log Per Session** features concurrently. |
| **App Events for Time Tracking Sessions** | OFF | Only available to our **👥 Team** and **💫 Unlimited** subscribers. When enabled, **App Events** are logged within the relevant HubSpot CRM record's activity timeline for each submitted time tracking session. This makes it possible to build HubSpot Workflows and Reports based on the submission of individual time tracking sessions. |
| **Timesheet Managers** | None | Assign the role of **Timesheet Manager** to individual users. Timesheet Managers can view and edit all users' Timesheets and submit time tracking sessions on their behalf. App Admins inherently have Timesheet Manager permissions, so they aren't shown as options in this setting. |
Please refer to the below table for an explanation of all the user-specific settings available within the "User Settings" tab.
| Setting | Default | Description |
| ------------------------------------ | ---------------------------------------------------------- | ---------------------------------------------------------------------------------------------------------------------------------------------------------------------------------------------------------------------------------------------------------------------------------------------------------------------------------------------------------------------------------------------------------------------------------------------------------------------------------------------------------------------------------------------------------------------------------------------------------------------------------------------------------------------------------------------------------------------------------------------------------------------------------------------------------------------------------------------------------------------------------------- |
| **Admin User** | OFF | Visible to admins only If enabled, this user is assigned admin privileges. Only existing admins can assign/remove admin privileges to/from other users. The Primary Admin cannot have their admin privileges removed within the app settings. To change the Primary Admin user, please submit a [support request](https://www.threadi.au/support?app_name=stopwatch). |
| **1 Time Log Per Session** | OFF | If enabled, each time tracking session is represented as its own Time Log record. Enables users to specify custom Time Log 'Titles', 'Categories' and 'Descriptions', unlocking powerful segmentation capabilities for your time tracking data. Also enables analysis relating to when time was tracked. |
| **Associate Engagements Option** | OFF | Only available if the **1 Time Log Per Session** setting is enabled. Enables the selective association between Time Logs and one or more related HubSpot Engagements (e.g. Tasks, Meetings and Calls). This makes it possible to create custom reports displaying time tracked against Engagements. |
| **Split Time Logs By Week** | OFF | Allows for time tracked via the StopWatch App Card and Workflow Actions to be segmented by the week of a given year. This is useful for reporting and automation use cases where tracked time needs to be segmented by individual weeks of a given year (e.g. 'Last week'). |
| **Split Time Logs By Month** | OFF | Allows for time tracked via the StopWatch App Card and Workflow Actions to be segmented by "Month + Year". This is useful for reporting and automation use cases where tracked time needs to be segmented by month/year combination (e.g. March 2026). |
| **Auto Start Timer** | OFF | If enabled, starts the timer automatically when an individual HubSpot CRM record view is loaded, assuming all of the following conditions are met:
**1. The "StopWatch" App Card is present on the given record view.**
**2. You've already tracked time against the given HubSpot CRM record** (excl. *1 Time Log Per Session* records). The first time tracking session per record (and per period, if you've enabled either "Split By Week" or "Split By Month") must be submitted manually. This condition can be bypassed via the **Auto Start Override** adming setting.
**3. Timer last stopped >1 minute ago.** This is to avoid unintentionally restarting the timer soon after having stopped it. This requirement does not apply if you have enabled both the **1 Time Log Per Session** user setting and **Auto Start Override** admin setting. |
| **Billable By Default** | OFF | If enabled, all time tracking sessions are flagged as billable by default. If the user has the 'Billable Time Option' enabled (see below), they can manually override the billable status for each individual time tracking session. |
| **Billable Time Option** | OFF | Allows for time tracked via the StopWatch App Card to be segmented into the groups "Billable" and "Total". This is particularly useful for reporting and automating use cases where tracked time needs to be segmented as "Billable", "Total" or "Non-Billable" (i.e. "Total" minus "Billable"). |
| **Round Up Time Tracking Sessions** | Disabled | Allows for time tracked via the StopWatch App Card to be rounded up to the nearest 1, 5, 6, 15, 30 or 60 minute interval. |
| **Quick Add Session Increments** | Default | Configure the duration increments available when submitting a 'Quick Add' time tracking session (in 'Simple' submission mode). |
| **Show 'Team Summary Data' Section** | OFF | If enabled, the aggregated time tracked by all team members and other useful summary data is displayed in the StopWatch App Card (relevant to the CRM record being viewed). |
| **Show 'Quick Add' Feature** | ON | Controls whether the 'Quick Add' feature is displayed within the StopWatch App Card. |
| **Preferred Date Format** | Default | Customise the date format used in certain app features, including the **Start Date** Quick Add input field. **Medium** and **Long** date format options are localised. |
| **Max One Active Timer** | OFF | Controls whether only one timer can be active at a time. If enabled, manually starting a timer via the StopWatch App Card will automatically stop any other active timers belonging to the given user. |
| **Weekly Capacity (Hours)** | 0 | The number of hours this user is available per week (min: 0, max: 168). Used for capacity calculations in the app's Timesheets feature. |
Time Log Categories can only be selected by users who have the '1 Time Log Per Session' setting enabled (explained in the 'User Settings' tab).
Manage the categories that are available when creating Time Logs. There are a handful of default categories that are automatically available upon installing the app. These categories are customisable -- it's possible to delete existing and create new categories for your team to use when they submit time tracking sessions.
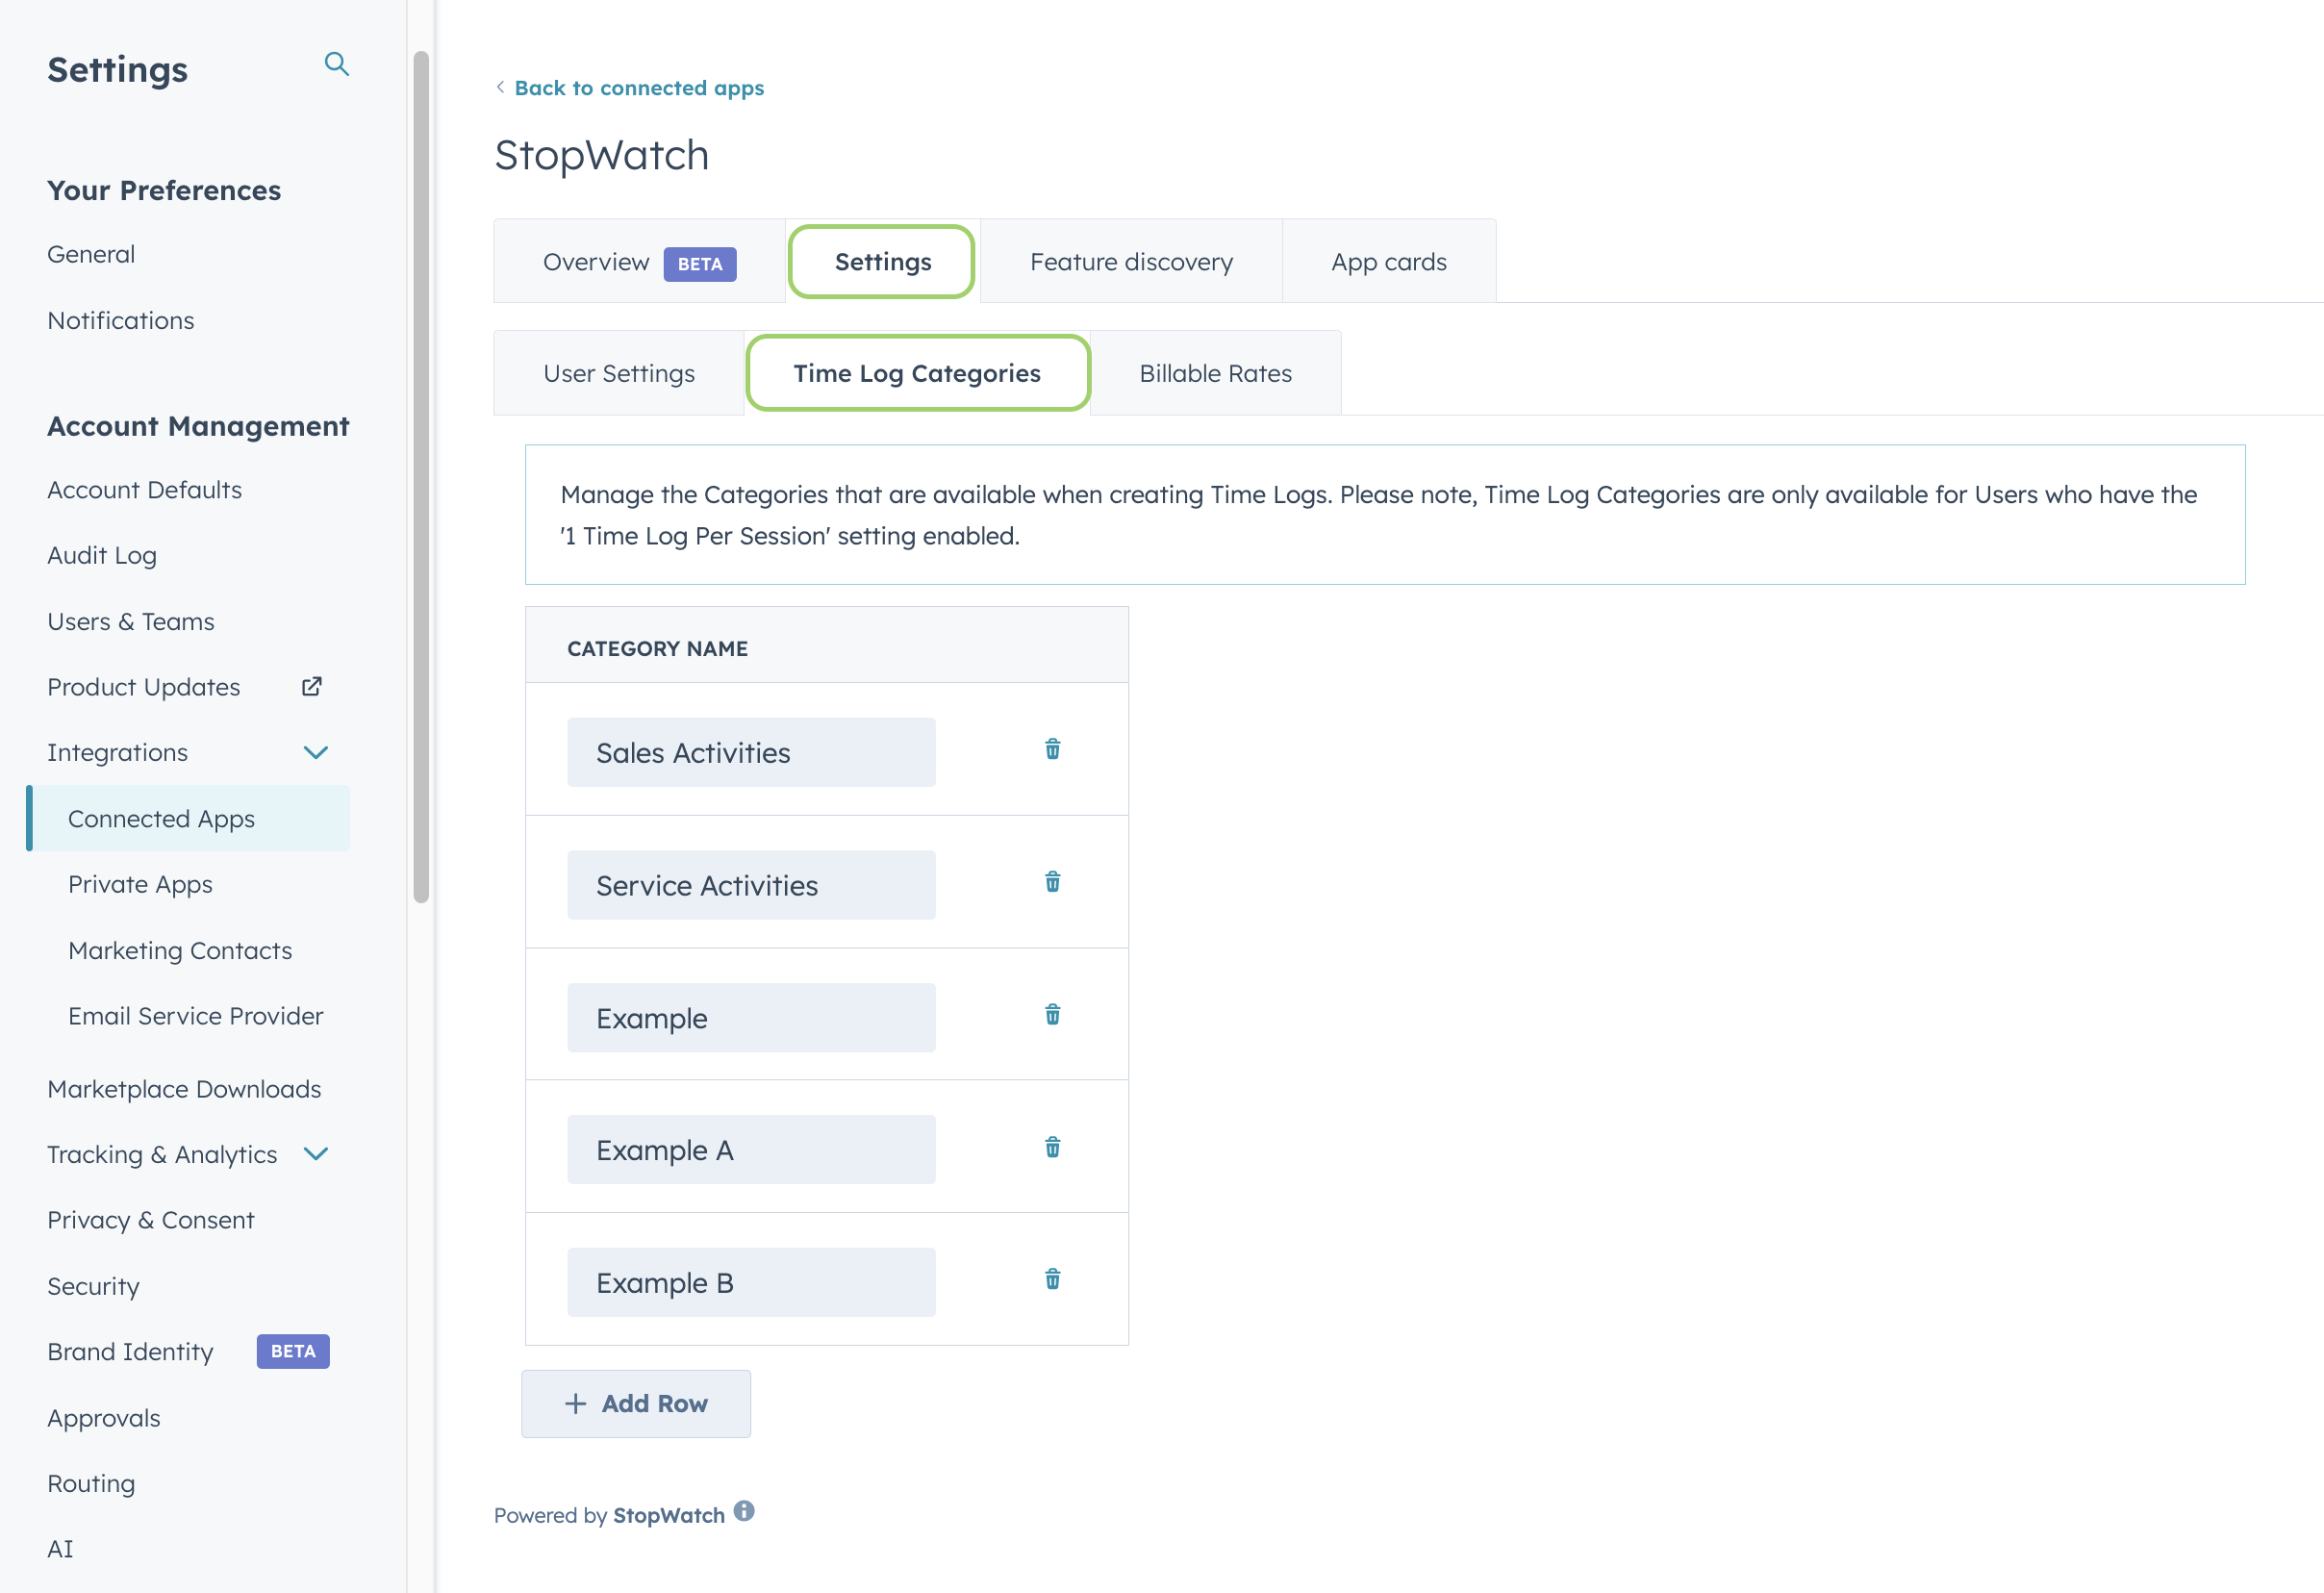 Billable Rates are only available for **💫 Unlimited** subscribers
Manage the hourly billable rate and hourly cost used by StopWatch when calculating the Time Log **Billable Amount**, **Cost Amount** and **Margin Amount** properties.
Admins can choose between:
* **👤 User-Based**: billable rates are managed per HubSpot User
* **💼 Service-Based**: billable rates are managed per Service
The **Service** selector in the **StopWatch** App Card is only shown when all of the following conditions are true:
1. **Billable Rate Type** is set to **Service-Based**
2. At least 1 Service has been configured
3. The user's **1 Time Log Per Session** setting is enabled
Billable Rates are only available for **💫 Unlimited** subscribers
Manage the hourly billable rate and hourly cost used by StopWatch when calculating the Time Log **Billable Amount**, **Cost Amount** and **Margin Amount** properties.
Admins can choose between:
* **👤 User-Based**: billable rates are managed per HubSpot User
* **💼 Service-Based**: billable rates are managed per Service
The **Service** selector in the **StopWatch** App Card is only shown when all of the following conditions are true:
1. **Billable Rate Type** is set to **Service-Based**
2. At least 1 Service has been configured
3. The user's **1 Time Log Per Session** setting is enabled

 [Top of section](#app-settings)
[Top of page](#)
## 12. Time Zones
Dates and times are always stored in HubSpot as UTC. However, when displaying dates and times in certain app interfaces, **StopWatch for HubSpot** uses your HubSpot Portal's time zone by default.
By default, when displaying times in certain app interfaces, **StopWatch for HubSpot** uses your HubSpot Portal's time zone. However, you can override this default behaviour by specifying a preferred time zone per user, as follows:
Open your HubSpot account and click the icon in the top navigation bar.
Via the left sidebar, navigate to Account Management > Users & Teams
From the list of users, click the relevant user's display name to open their user configuration area.
Click the **Preferences** tab, then scroll down to the **Time zone** setting. Update the time zone as required, then click **Save**.
## 13. Uninstall App
If you need to uninstall the app from your HubSpot account, this can be performed via HubSpot's **Connected Apps** settings page.
Open your HubSpot account and click the icon in the top navigation bar.
Via the left sidebar, navigate to Account Management > Integrations > Connected Apps
From the list of apps connected to your HubSpot account, find **StopWatch** and click the **Actions** dropdown button. Then click **Uninstall**.
Once the app is uninstalled, your HubSpot account would no longer be connected to the **StopWatch for HubSpot** app. As such, you would no longer be able to use any **StopWatch for HubSpot** features. However, any existing time tracking data will remain stored within your HubSpot account.
Additionally, any existing HubSpot Workflows leveraging **StopWatch for HubSpot** features will be flagged with a **Changes needed** (or similar) alert. Please note, any such workflow executions occurring after the app has been uninstalled will result in error.
**StopWatch for HubSpot** features and associated data are contained entirely within HubSpot. As such, uninstalling the app is the only action required by you to effectively disconnect your HubSpot account from the app. If you have any questions regarding the disconnection of your HubSpot account with the app, please feel free to submit a [support request](https://www.threadi.au/support?app_name=stopwatch).
[Top of section](#uninstall-app)
[Top of page](#)
[Top of section](#app-settings)
[Top of page](#)
## 12. Time Zones
Dates and times are always stored in HubSpot as UTC. However, when displaying dates and times in certain app interfaces, **StopWatch for HubSpot** uses your HubSpot Portal's time zone by default.
By default, when displaying times in certain app interfaces, **StopWatch for HubSpot** uses your HubSpot Portal's time zone. However, you can override this default behaviour by specifying a preferred time zone per user, as follows:
Open your HubSpot account and click the icon in the top navigation bar.
Via the left sidebar, navigate to Account Management > Users & Teams
From the list of users, click the relevant user's display name to open their user configuration area.
Click the **Preferences** tab, then scroll down to the **Time zone** setting. Update the time zone as required, then click **Save**.
## 13. Uninstall App
If you need to uninstall the app from your HubSpot account, this can be performed via HubSpot's **Connected Apps** settings page.
Open your HubSpot account and click the icon in the top navigation bar.
Via the left sidebar, navigate to Account Management > Integrations > Connected Apps
From the list of apps connected to your HubSpot account, find **StopWatch** and click the **Actions** dropdown button. Then click **Uninstall**.
Once the app is uninstalled, your HubSpot account would no longer be connected to the **StopWatch for HubSpot** app. As such, you would no longer be able to use any **StopWatch for HubSpot** features. However, any existing time tracking data will remain stored within your HubSpot account.
Additionally, any existing HubSpot Workflows leveraging **StopWatch for HubSpot** features will be flagged with a **Changes needed** (or similar) alert. Please note, any such workflow executions occurring after the app has been uninstalled will result in error.
**StopWatch for HubSpot** features and associated data are contained entirely within HubSpot. As such, uninstalling the app is the only action required by you to effectively disconnect your HubSpot account from the app. If you have any questions regarding the disconnection of your HubSpot account with the app, please feel free to submit a [support request](https://www.threadi.au/support?app_name=stopwatch).
[Top of section](#uninstall-app)
[Top of page](#)
[Top of page](#)
***
**StopWatch for HubSpot** is created and managed by [Thread Integrations](https://www.threadi.au/), a small Australian business providing expert system integration, software development & analytics services.