> ## Documentation Index
> Fetch the complete documentation index at: https://docs.threadi.au/llms.txt
> Use this file to discover all available pages before exploring further.
# Utilities for HubSpot
> This **App Usage Guide** aims to help you get up and running with **Utilities for HubSpot**, an app providing extra features for your HubSpot account, as [requested by you](https://utilities.threadi.au/feature-request).
## 1. Installing Utilities for HubSpot
To use our **Custom Workflow Actions**, your HubSpot account must have access to [Workflows](https://knowledge.hubspot.com/workflows/create-workflows).
Before you can start using **Utilities for HubSpot**, you must successfully install the app within your HubSpot account. Choose one of the 2 options below to get started.
Install via the HubSpot App Marketplace
Install via direct OAuth link
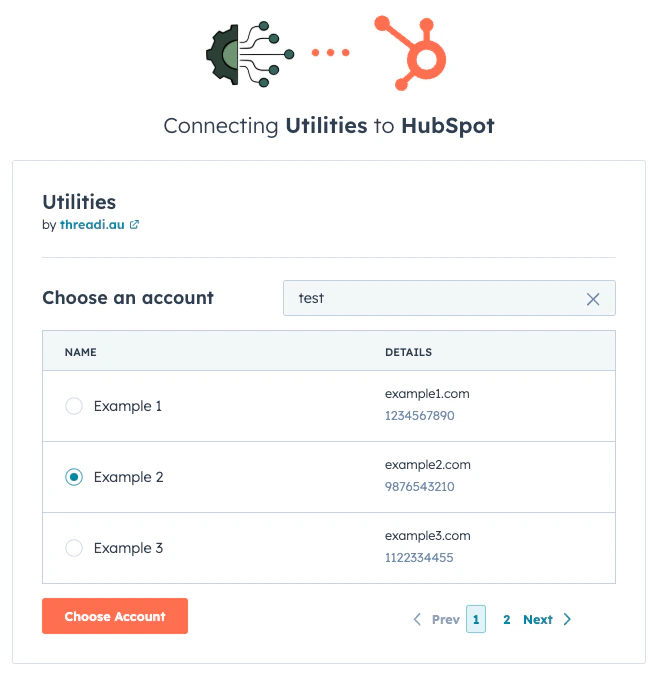
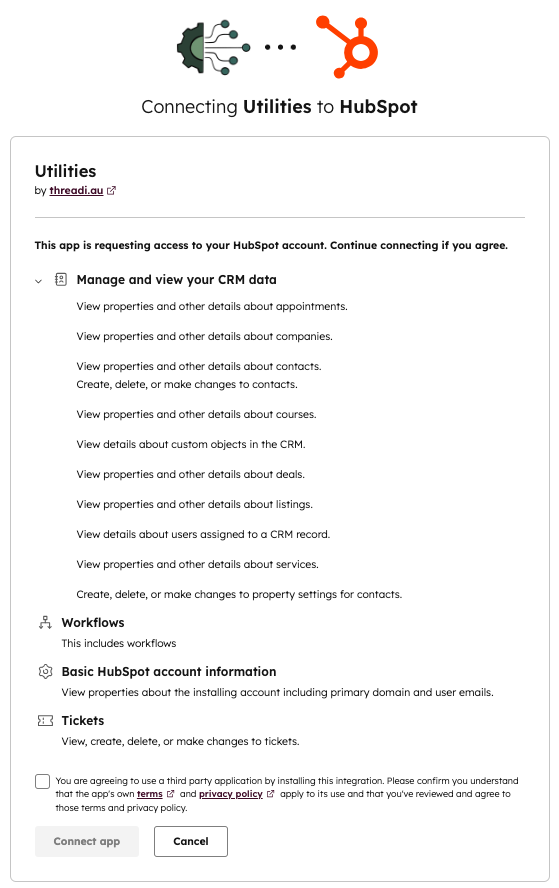
As part of the installation process, HubSpot will ask you to confirm within which account/portal you'd like to install the **Utilities for HubSpot** app. You'll then be prompted to allow **Utilities for HubSpot** access to certain information and permissions relating to the selected HubSpot account. We only request access and permissions necessary to deliver our services. If you'd like to discuss why we need certain access or permissions, please get in touch via email: [support@threadi.au](mailto:support@threadi.au)
### App Installation Process Screenshots
 [Top of section](#installing-utilities-for-hubspot)
[Top of page](#)
## 2. Subscriptions
Free trial ended? Create a subscription to continue enjoying access to app features
Once you've successfully installed the app **for the first time** within your HubSpot account, you'll have temporary access to all app features as part of a 14 day free trial period. Once this free trial period has ended, you'll need to purchase a **Utilities for HubSpot** subscription to continue using app features.
You can compare all available subscription options on our [Pricing page](/pricing?app=utilities). Once you choose a suitable subscription level, you'll need to confirm via our third-party payment provider, **Stripe**. Once you've successfully confirmed your subscription, you can manage it via our [customer portal](https://billing.stripe.com/p/login/3csdSc2wP68ybTi144) (powered by **Stripe**).
Links for each subscription option are available [here](/pricing?app=utilities). Multiple currency options are available, including AUD, USD, GBP, EUR, CAD, NZD
[Top of section](#subscriptions)
[Top of page](#)
## 3. Custom Workflow Actions
Installing **Utilities for HubSpot** makes available a number of **Custom Workflow Actions** within your HubSpot portal.
In order to use our **Custom Workflow Actions**, you must have:
* An active [**Utilities for HubSpot** subscription](#subscriptions)
* Access to [HubSpot Workflows](https://knowledge.hubspot.com/workflows/create-workflows)
**Maximum 1,000 total workflow action requests per 24hr period.** If this limit is reached, subsequent requests within the same period will be rejected. If you need a higher limit, please submit a [support request](https://www.threadi.au/support?app_name=utilities).
Our **Custom Workflow Actions** are available for workflows of the following object types:
* Contact
* Company
* Deal
* Ticket
* Appointment
* Course
* Listing
* Service
* Project
* Custom Object
* [Available upon special request](https://www.threadi.au/support?app_name=utilities)
Our custom workflow actions are organised below into 3 categories: [**Tasks**](#tasks), [**Meetings**](#meetings) and [**Merging**](#merging).
#### Mark Associated Tasks as Complete
[Top of section](#installing-utilities-for-hubspot)
[Top of page](#)
## 2. Subscriptions
Free trial ended? Create a subscription to continue enjoying access to app features
Once you've successfully installed the app **for the first time** within your HubSpot account, you'll have temporary access to all app features as part of a 14 day free trial period. Once this free trial period has ended, you'll need to purchase a **Utilities for HubSpot** subscription to continue using app features.
You can compare all available subscription options on our [Pricing page](/pricing?app=utilities). Once you choose a suitable subscription level, you'll need to confirm via our third-party payment provider, **Stripe**. Once you've successfully confirmed your subscription, you can manage it via our [customer portal](https://billing.stripe.com/p/login/3csdSc2wP68ybTi144) (powered by **Stripe**).
Links for each subscription option are available [here](/pricing?app=utilities). Multiple currency options are available, including AUD, USD, GBP, EUR, CAD, NZD
[Top of section](#subscriptions)
[Top of page](#)
## 3. Custom Workflow Actions
Installing **Utilities for HubSpot** makes available a number of **Custom Workflow Actions** within your HubSpot portal.
In order to use our **Custom Workflow Actions**, you must have:
* An active [**Utilities for HubSpot** subscription](#subscriptions)
* Access to [HubSpot Workflows](https://knowledge.hubspot.com/workflows/create-workflows)
**Maximum 1,000 total workflow action requests per 24hr period.** If this limit is reached, subsequent requests within the same period will be rejected. If you need a higher limit, please submit a [support request](https://www.threadi.au/support?app_name=utilities).
Our **Custom Workflow Actions** are available for workflows of the following object types:
* Contact
* Company
* Deal
* Ticket
* Appointment
* Course
* Listing
* Service
* Project
* Custom Object
* [Available upon special request](https://www.threadi.au/support?app_name=utilities)
Our custom workflow actions are organised below into 3 categories: [**Tasks**](#tasks), [**Meetings**](#meetings) and [**Merging**](#merging).
#### Mark Associated Tasks as Complete
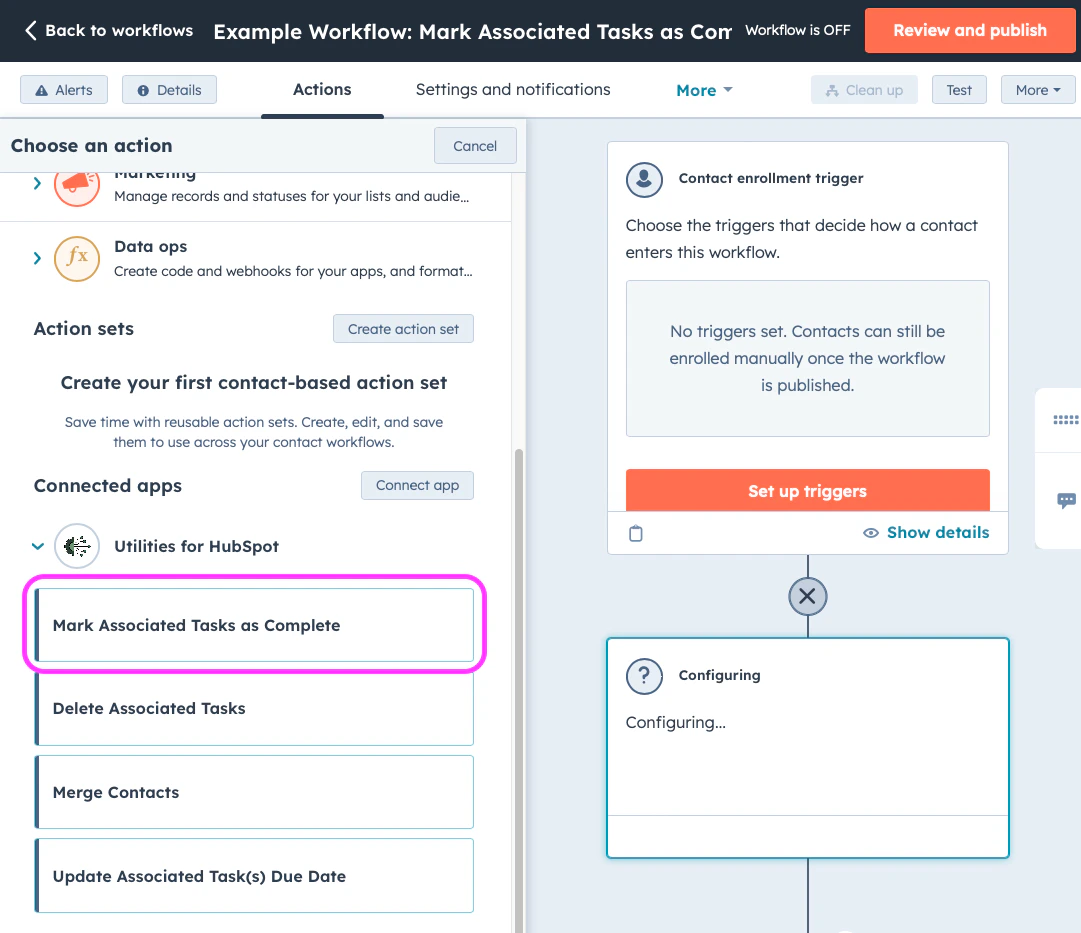
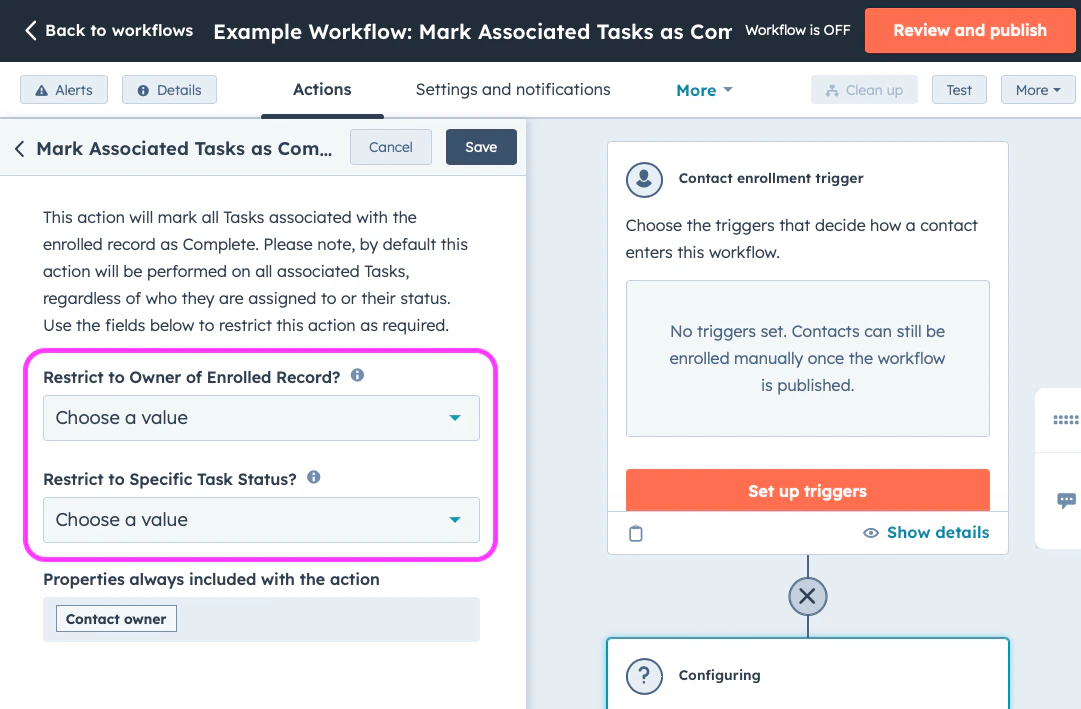
When deployed within a HubSpot workflow, this action marks all Tasks associated with the enrolled record as Complete ✅. By default, this action is performed on **all Tasks** associated with the enrolled record.
If this default behaviour does not suit your use case, the workflow action can be restricted using any combination of the following options:
1. Tasks sharing the same Owner as the enrolled record
2. Tasks that have a specific Status
Below is a short screen recording showing a basic example of how to deploy this feature.
#### Delete Associated Tasks
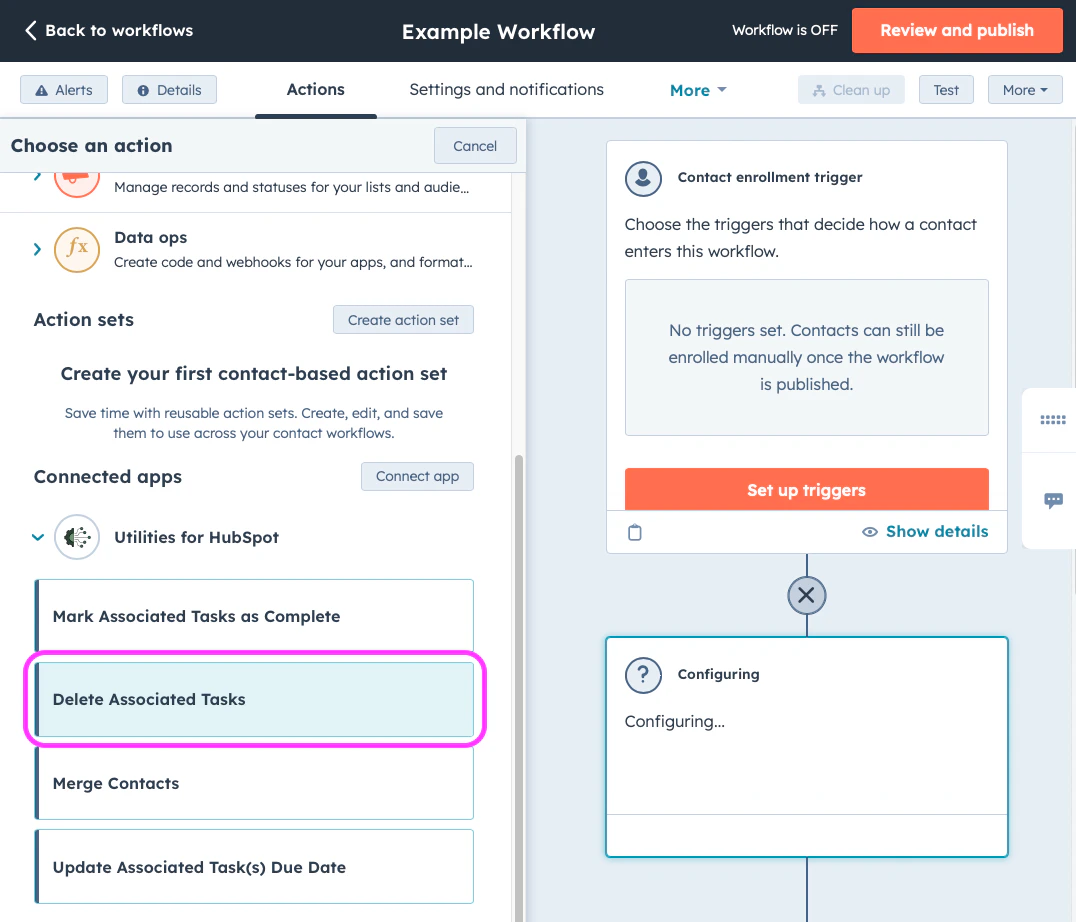
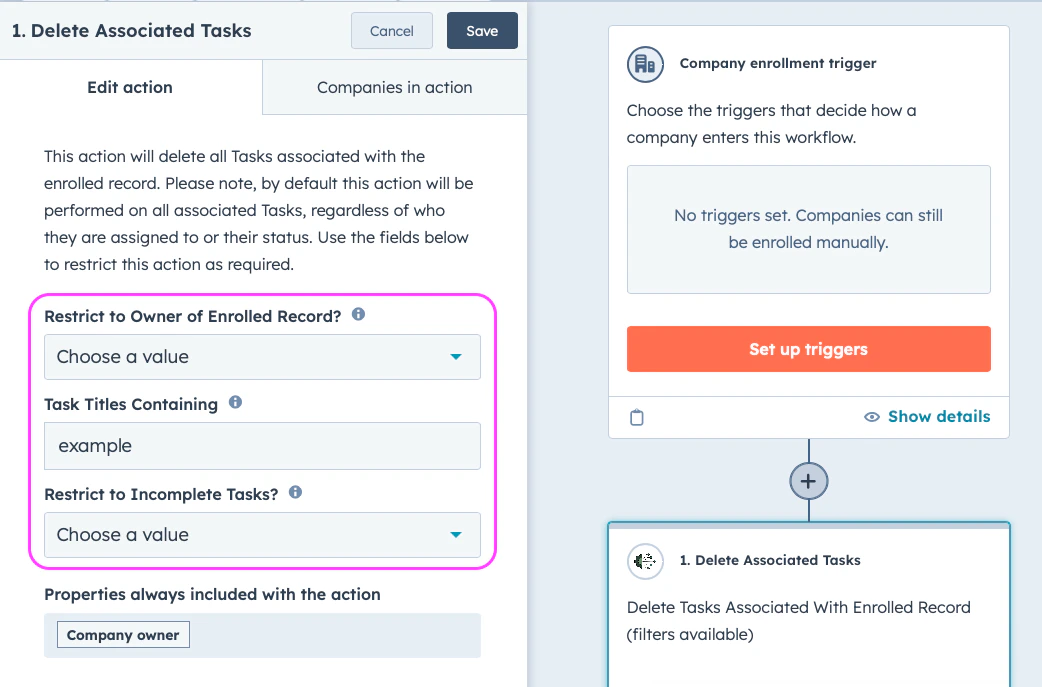
When deployed within a HubSpot workflow, this action deletes all Tasks associated with the enrolled record. By default, this action is performed on **all Tasks** associated with the enrolled record.
If this default behaviour does not suit your use case, the workflow action can be restricted using any combination of the following options:
1. Tasks sharing the same Owner as the enrolled record
2. Tasks with Titles that contain a search string of your choosing
3. Tasks that remain outstanding
Below is a short screen recording showing a basic example of how to deploy this feature.
#### Update Task Due Dates
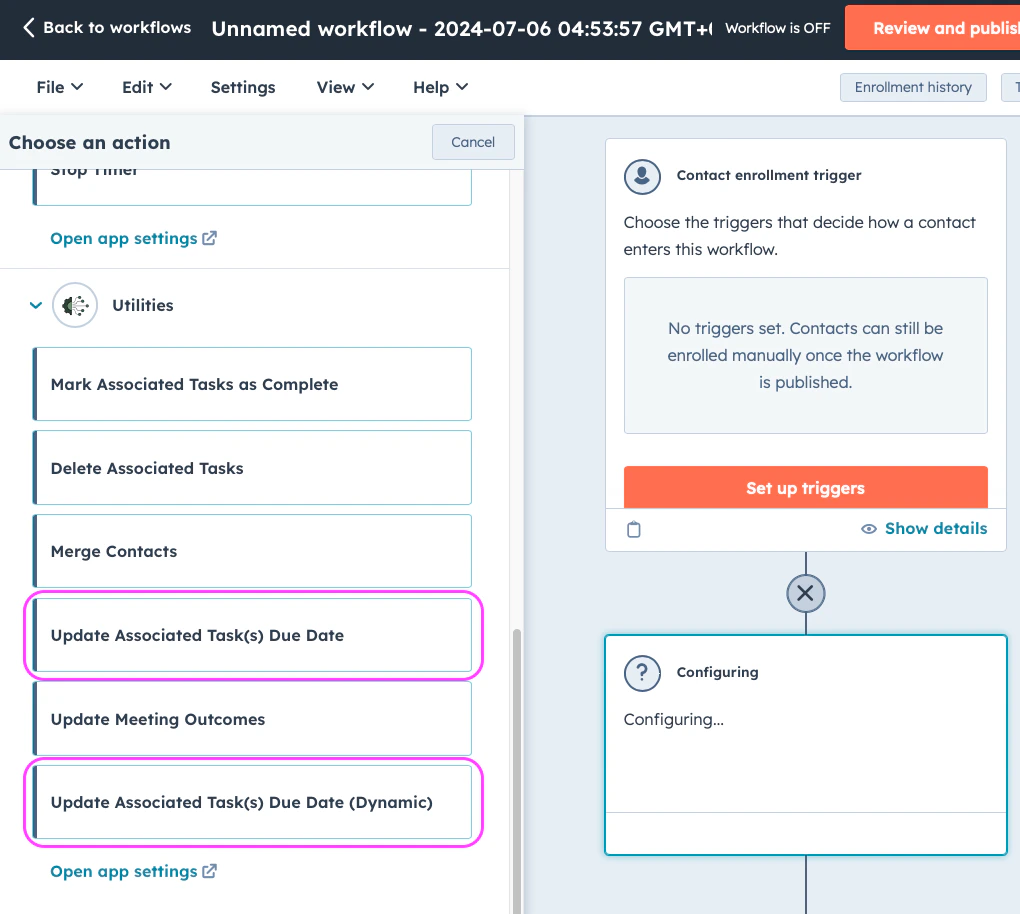
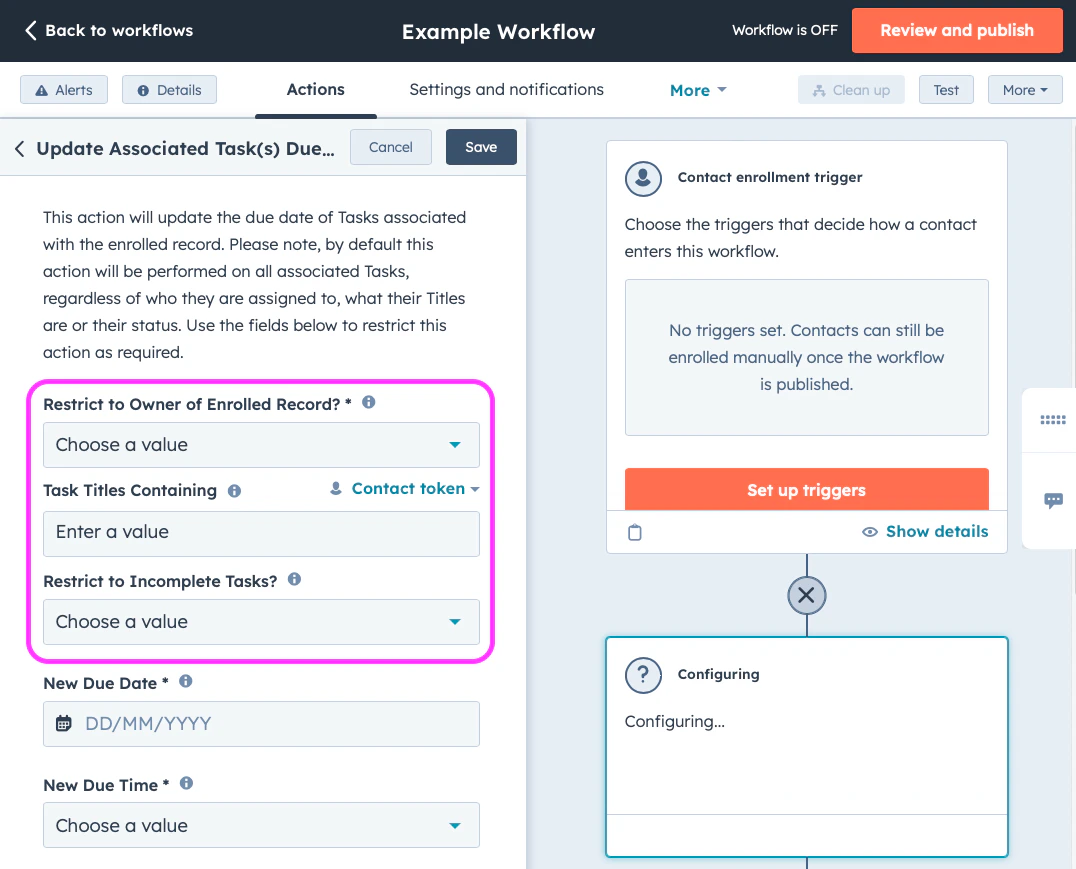
When deployed within a HubSpot workflow, these actions update the Due Dates of all Tasks associated with the enrolled record. By default, this action is performed on **all Tasks** associated with the enrolled record.
If this default behaviour does not suit your use case, the workflow action can be restricted using any combination of the following options:
1. Tasks sharing the same Owner as the enrolled record
2. Tasks with Titles that contain a search string of your choosing
3. Tasks that remain outstanding
If you would like to update the given Task Due Dates to a **static date**, use the workflow action **Update Associated Task(s) Due Date**. If you would like to set the due dates dynamically, use the workflow action **Update Associated Task(s) Due Date (Dynamic)**.
Below is a short screen recording showing a basic example of how to deploy this feature.
#### Update Meeting Outcomes
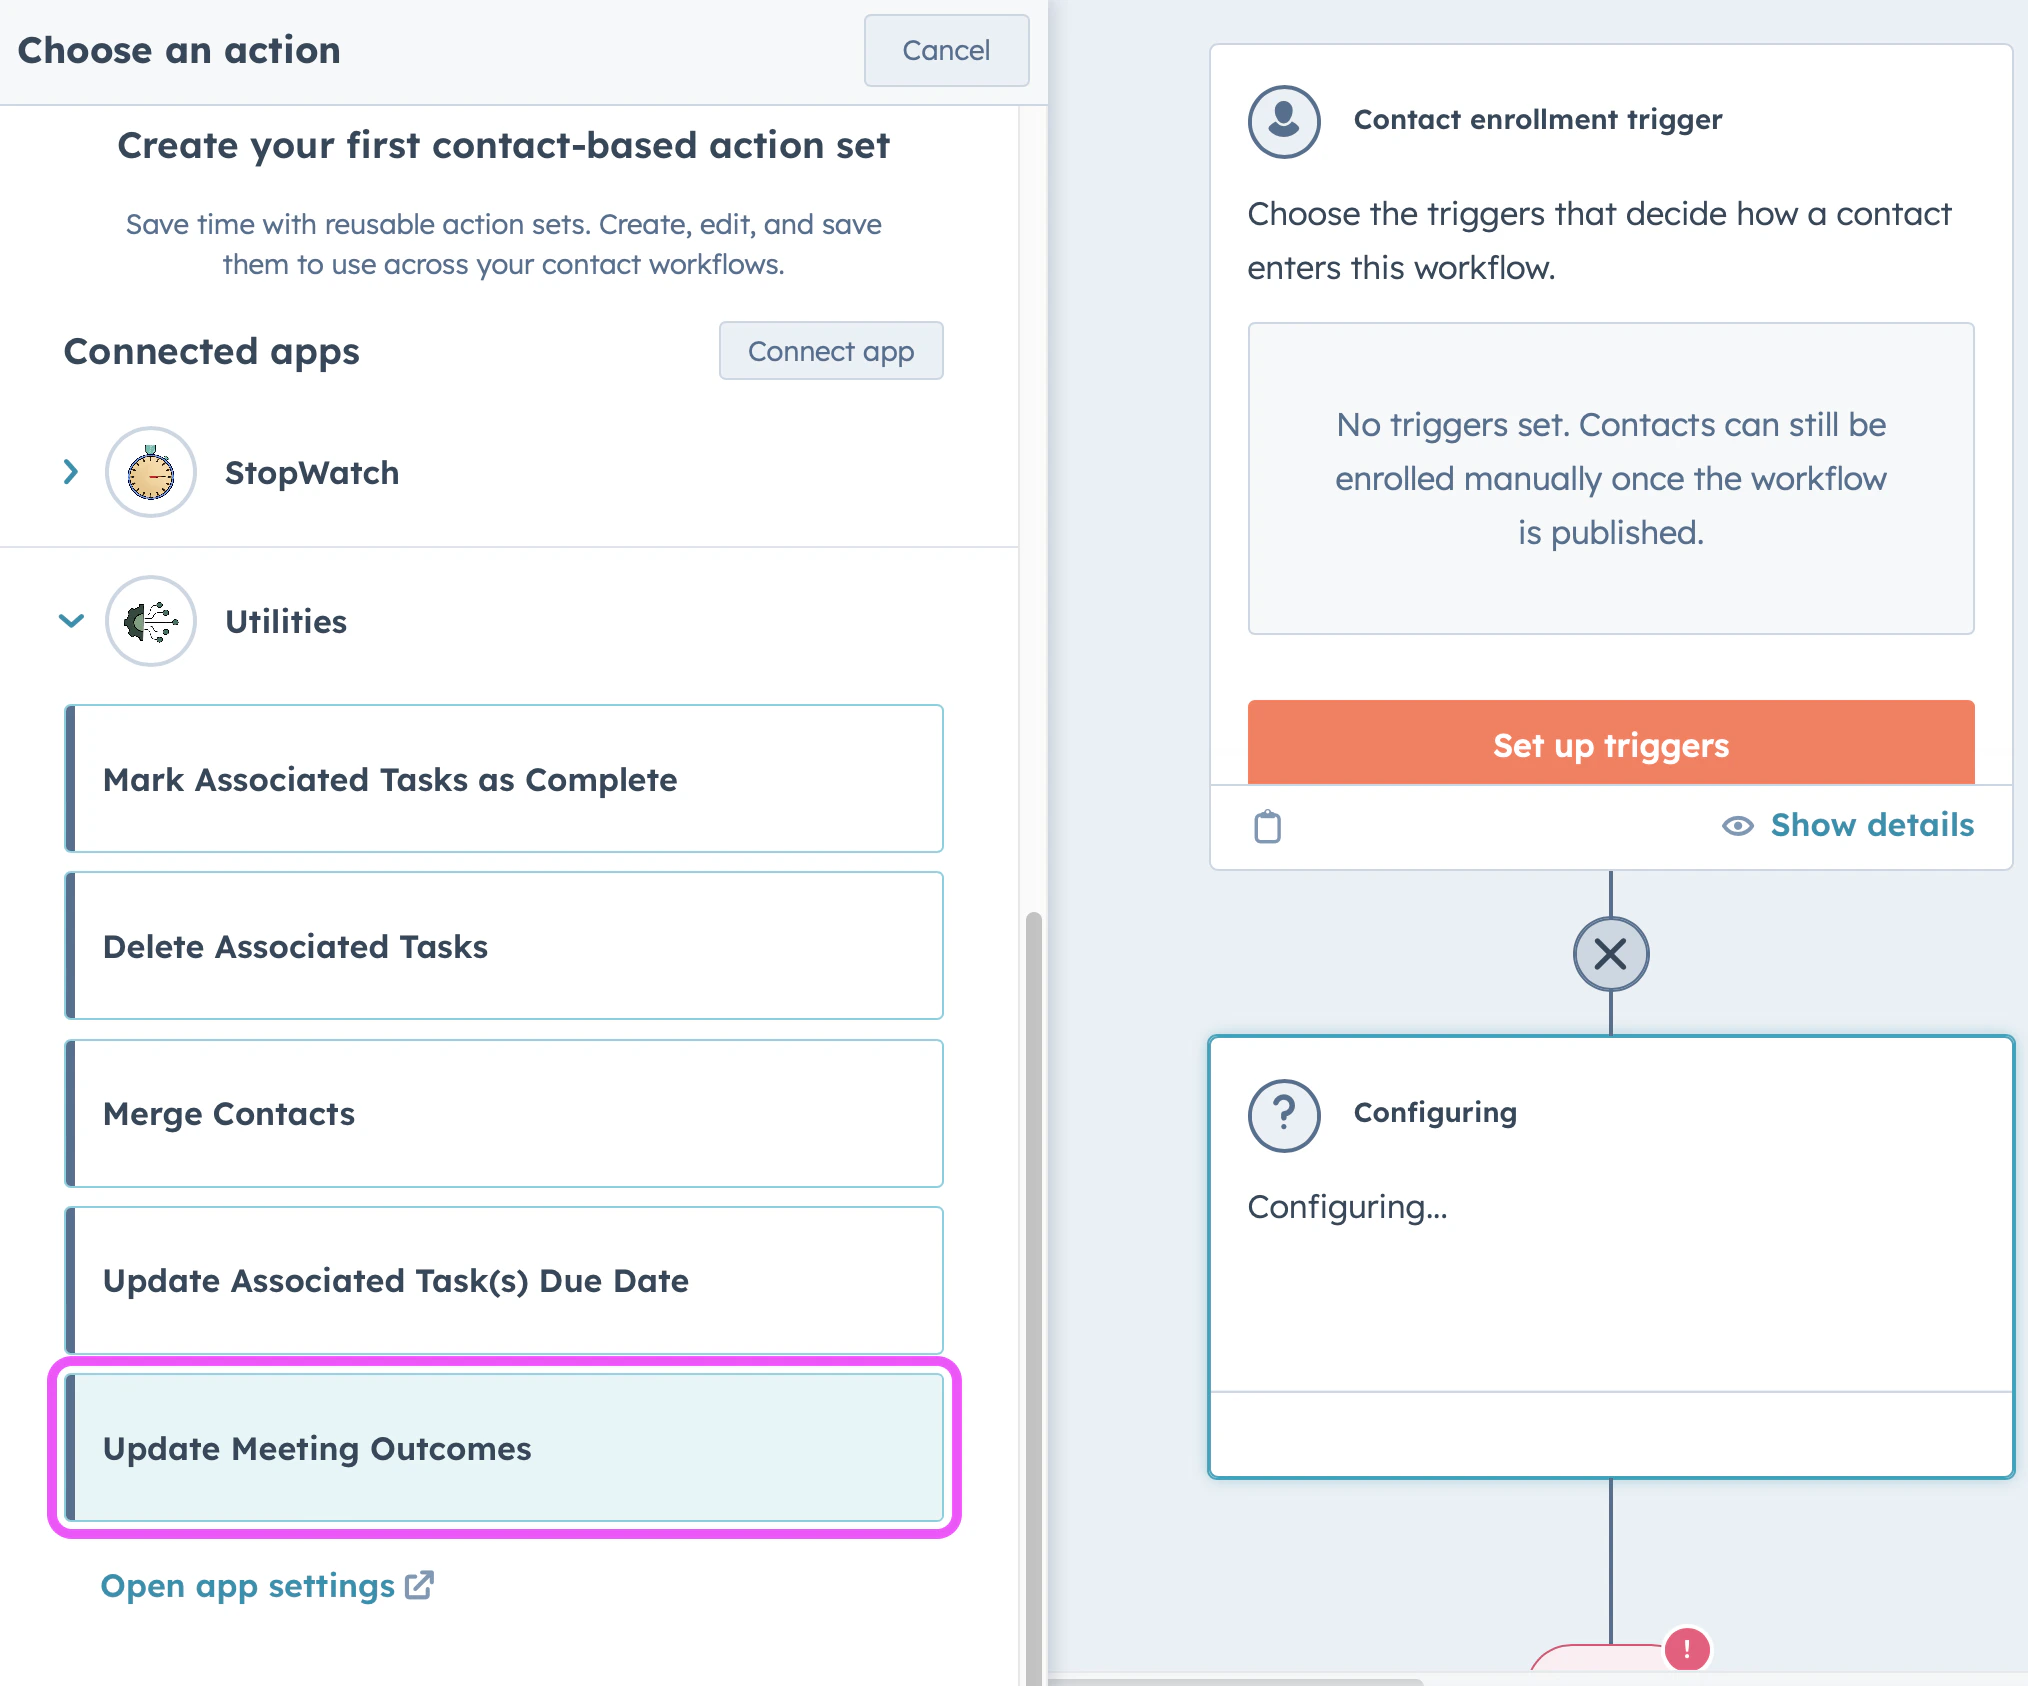
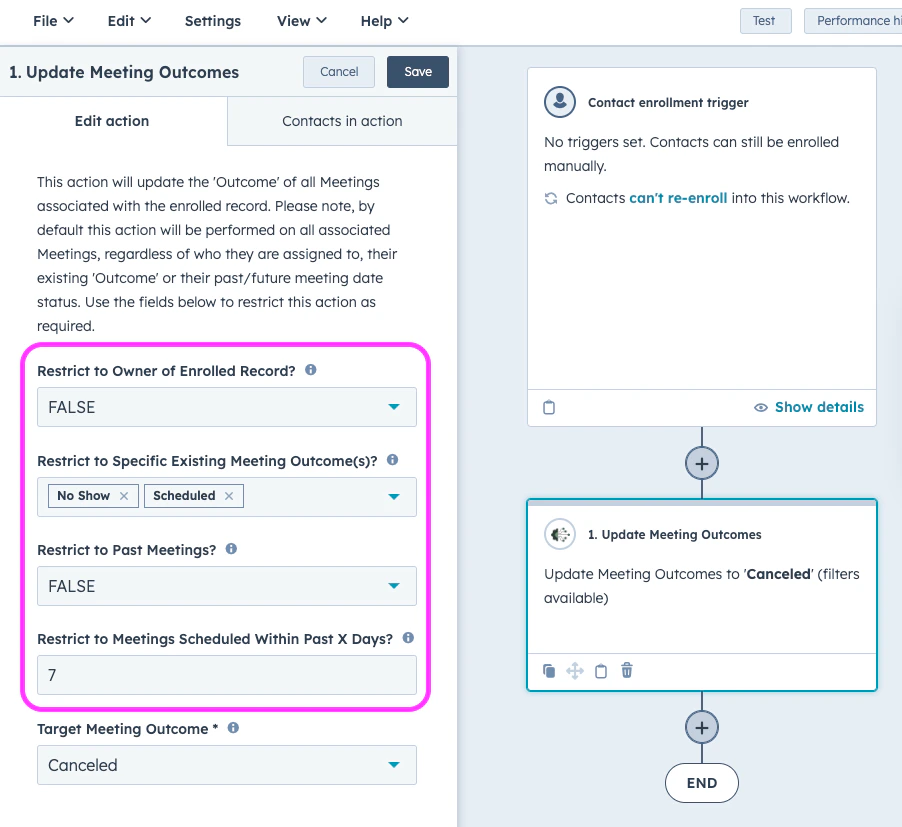
When deployed within a HubSpot workflow, this action updates the **Outcome** of all Meetings associated with the enrolled record. By default, this action is performed on **all Meetings** associated with the enrolled record.
If this default behaviour does not suit your use case, the workflow action can be restricted using any combination of the following options:
1. Meetings sharing the same Owner as the enrolled record
2. Meetings with existing specific **Outcomes**
3. Meetings that are scheduled in the past
4. Meetings that are scheduled within the past number of specified days
#### Delete Associated Meetings
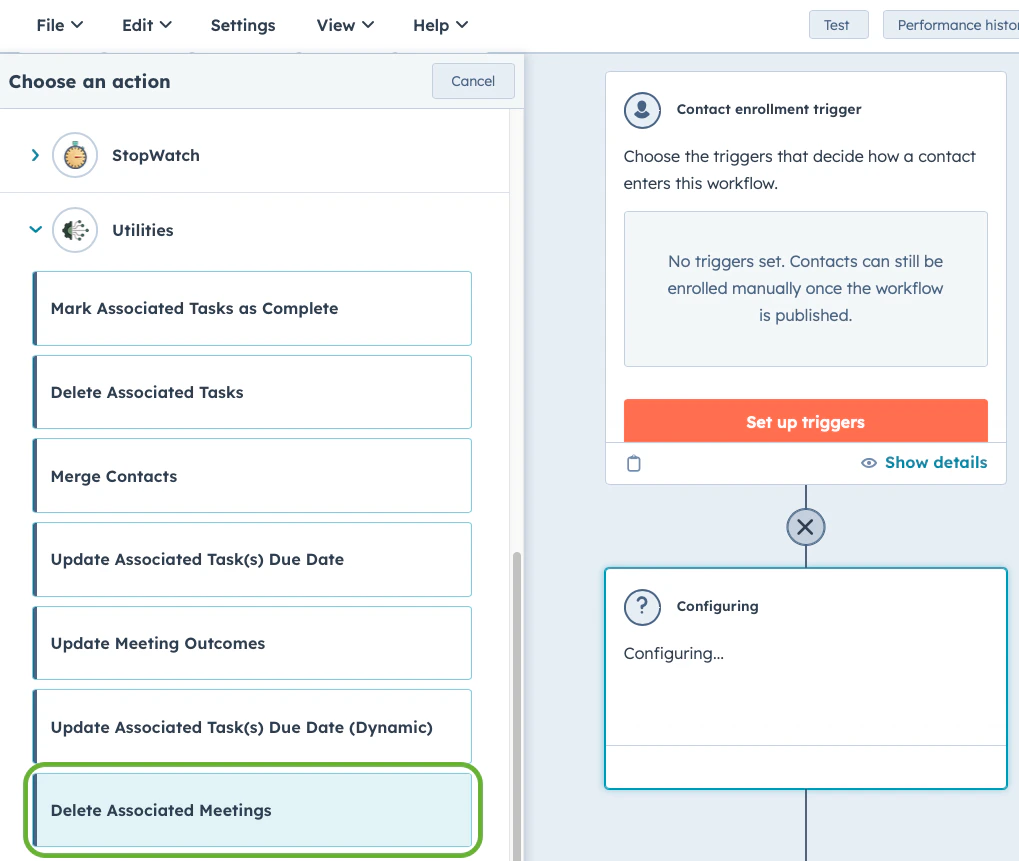
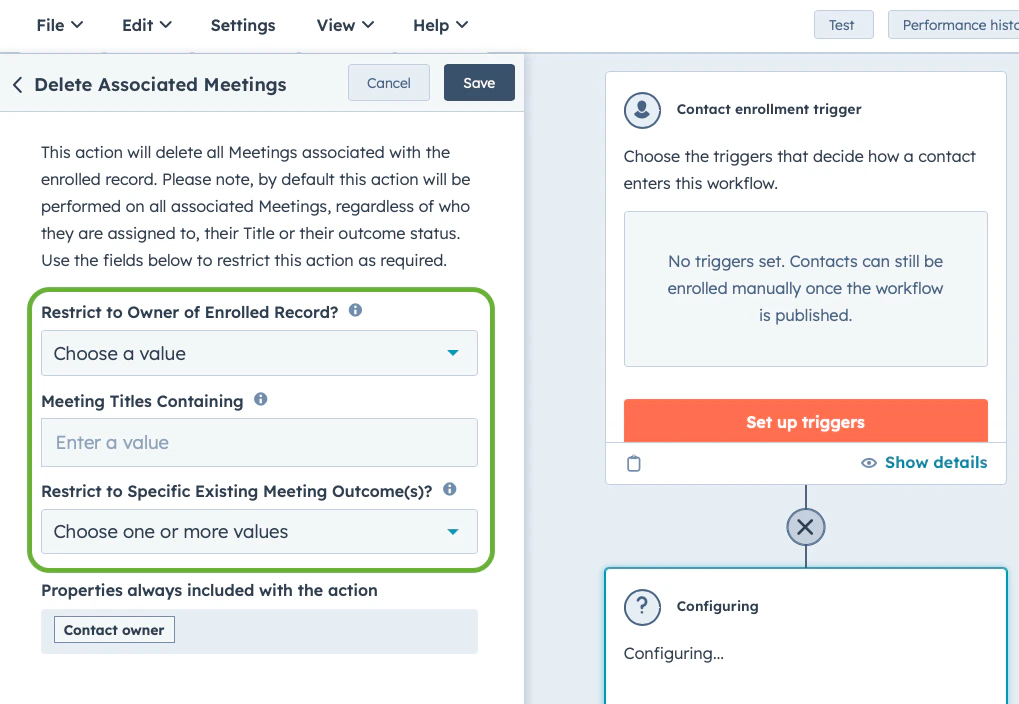
When deployed within a HubSpot workflow, this action deletes all Meetings associated with the enrolled record. By default, this action is performed on **all Meetings** associated with the enrolled record.
If this default behaviour does not suit your use case, the workflow action can be restricted using any combination of the following options:
1. Meetings sharing the same Owner as the enrolled record
2. Meetings with existing specific **Outcomes**
3. Meetings with **Titles** that contain a search string of your choosing
#### Merge Contacts
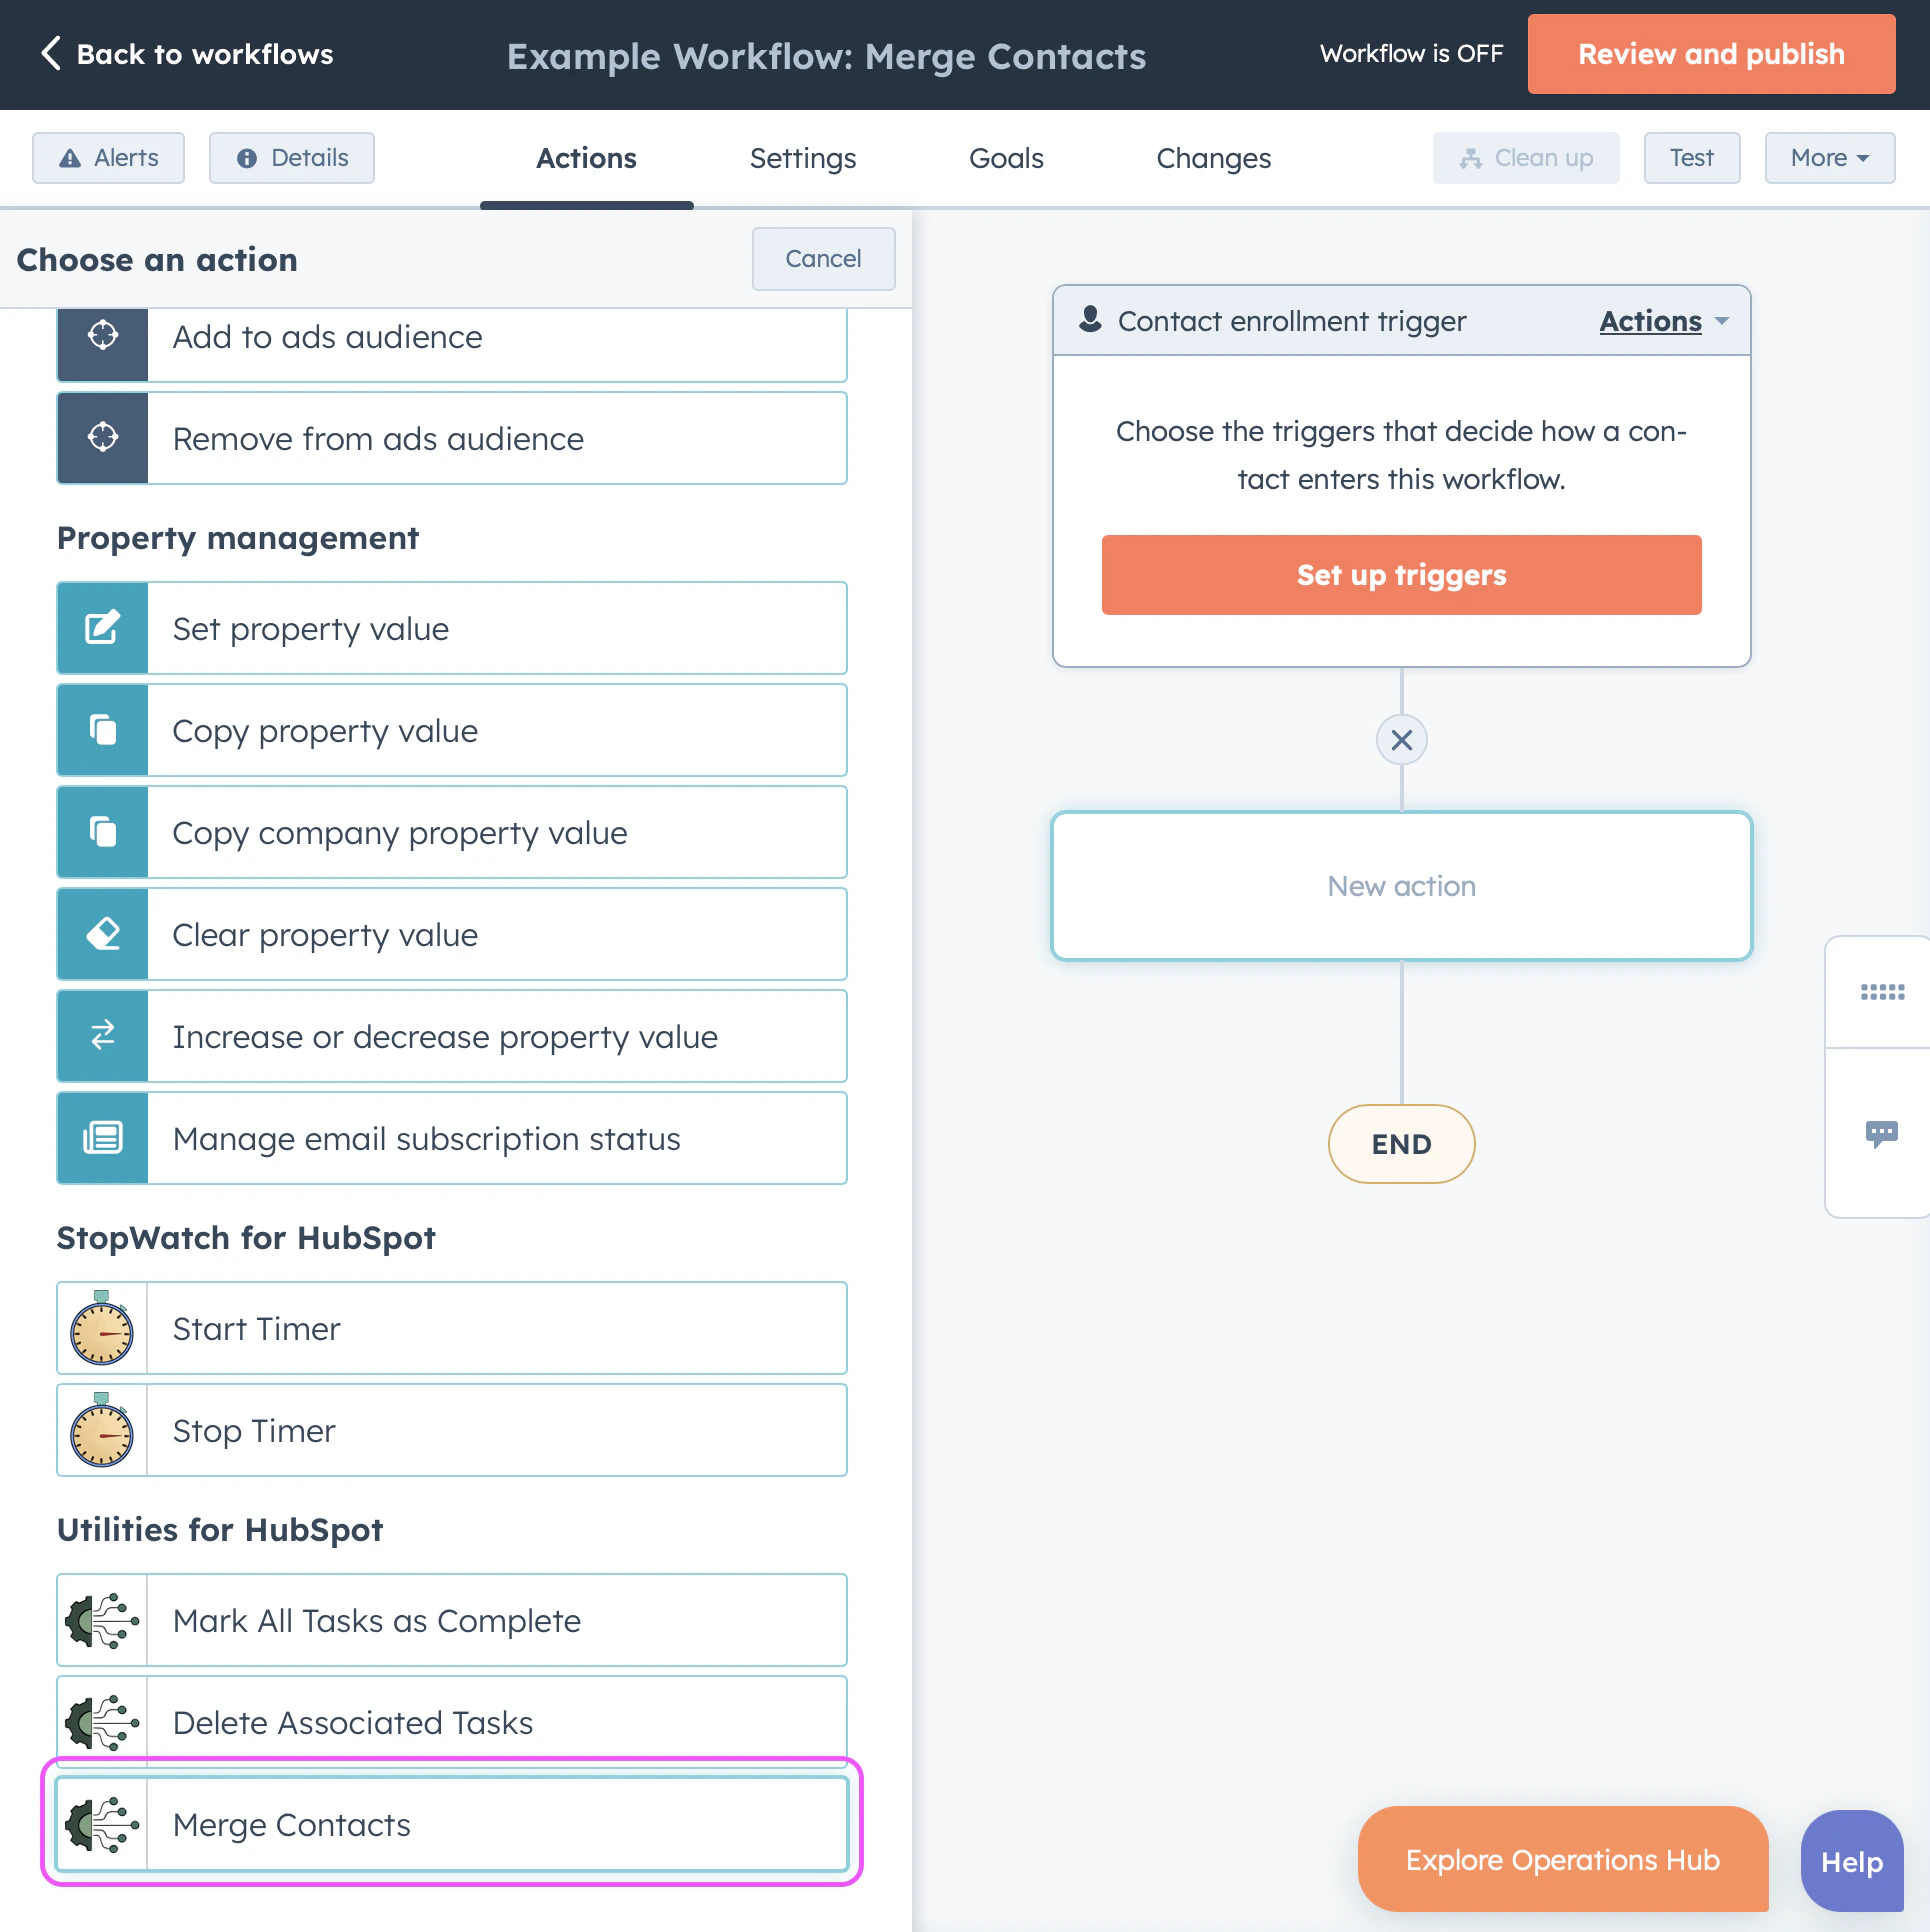 **Merging contacts cannot be undone.** When this custom workflow action is invoked, the data from the **Secondary Contact** will be merged into the **Primary Contact**. While you can see the combined history of the two records in the resulting single Contact, there is no way to separate the Contacts after the merge occurs. You can learn more about how merging records works in [this HubSpot Knowledge Base article](https://knowledge.hubspot.com/records/merge-records).
When deployed within a HubSpot workflow, this action merges the enrolled Contact into another Contact whose ID is specified within the property labelled **Merge Into Contact ID (Utilities for HubSpot)**. This is a custom property that is created when you install **Utilities for HubSpot**.
**Merging contacts cannot be undone.** When this custom workflow action is invoked, the data from the **Secondary Contact** will be merged into the **Primary Contact**. While you can see the combined history of the two records in the resulting single Contact, there is no way to separate the Contacts after the merge occurs. You can learn more about how merging records works in [this HubSpot Knowledge Base article](https://knowledge.hubspot.com/records/merge-records).
When deployed within a HubSpot workflow, this action merges the enrolled Contact into another Contact whose ID is specified within the property labelled **Merge Into Contact ID (Utilities for HubSpot)**. This is a custom property that is created when you install **Utilities for HubSpot**.
For example, if you'd like to merge Contact X into Contact Y, you should populate Contact X's property **Merge Into Contact ID (Utilities for HubSpot)** with Contact Y's record ID. The way this property is populated will depend entirely on your use case. See the screen recording below for this example in action.
A common use case involves creating a Contact workflow where the enrollment trigger is **Merge Into Contact ID (Utilities for HubSpot)** is known. Be sure to enable re-enrollment to cover error cases. Then insert the **Merge Contacts** custom workflow action and enable the workflow. If properly configured, this will merge any Contact where **Merge Into Contact ID (Utilities for HubSpot)** has been populated.
If a data conflict exists, the most recently modified property value is preserved. There are some [important exceptions](https://knowledge.hubspot.com/records/merge-records#contact-merge-exceptions) to this rule, including the email address property. The email address of the **Primary Contact** will remain the default email address of the resulting merged record. The email address of the **Secondary Contact** will be set as a secondary/alternate email address.
Below is a short screen recording showing a basic example of how to deploy this feature.
#### Merge Companies
If you most recently installed **Utilities for HubSpot** prior to 16 April 2026, you may need to reauthenticate the app in order for this feature to work as expected. This involves reinstalling the app. You can do this via the [Installing Utilities for HubSpot](#installing-utilities-for-hubspot) section.
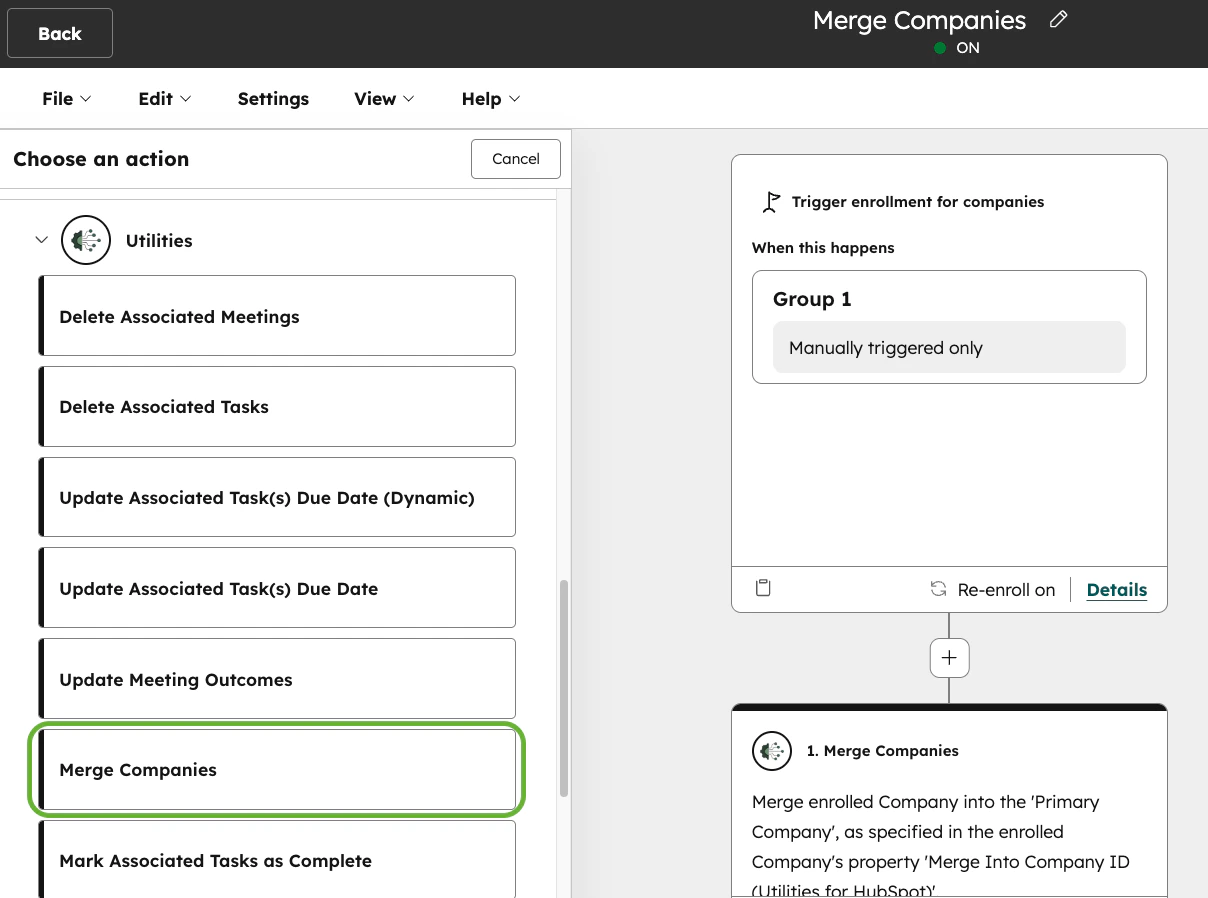 **Merging companies cannot be undone.** When this custom workflow action is invoked, the data from the **Secondary Company** will be merged into the **Primary Company**. While you can see the combined history of the two records in the resulting single Company, there is no way to separate the Companies after the merge occurs. You can learn more about how merging records works in [this HubSpot Knowledge Base article](https://knowledge.hubspot.com/records/merge-records).
When deployed within a HubSpot workflow, this action merges the enrolled Company into another Company whose ID is specified within the property labelled **Merge Into Company ID (Utilities for HubSpot)**. This is a custom property that is created when you install **Utilities for HubSpot**.
**Merging companies cannot be undone.** When this custom workflow action is invoked, the data from the **Secondary Company** will be merged into the **Primary Company**. While you can see the combined history of the two records in the resulting single Company, there is no way to separate the Companies after the merge occurs. You can learn more about how merging records works in [this HubSpot Knowledge Base article](https://knowledge.hubspot.com/records/merge-records).
When deployed within a HubSpot workflow, this action merges the enrolled Company into another Company whose ID is specified within the property labelled **Merge Into Company ID (Utilities for HubSpot)**. This is a custom property that is created when you install **Utilities for HubSpot**.
For example, if you'd like to merge Company X into Company Y, you should populate Company X's property **Merge Into Company ID (Utilities for HubSpot)** with Company Y's record ID. The way this property is populated will depend entirely on your use case.
A common use case involves creating a Company workflow where the enrollment trigger is **Merge Into Company ID (Utilities for HubSpot)** is known. Be sure to enable re-enrollment to cover error cases. Then insert the **Merge Companies** custom workflow action and enable the workflow. If properly configured, this will merge any Company where **Merge Into Company ID (Utilities for HubSpot)** has been populated.
If a data conflict exists, the most recently modified property value is preserved. There are some [important exceptions](https://knowledge.hubspot.com/records/merge-records#company-merge-exceptions) to this rule, including the Company Domain Name property. The Company Domain Name of the **Primary Company** will remain the default of the resulting merged record. The Company Domain Name of the **Secondary Company** will be set as a secondary domain name.
[Top of section](#custom-workflow-actions)
[Top of page](#)
## 4. Reassign Tasks When Record Owner Changes
Installing **Utilities for HubSpot** makes available optional settings that enable the automatic reassignment of Tasks when a record owner changes.
* In order to use this feature, you must have an active [**Utilities for HubSpot** subscription](#subscriptions).
* By default, this feature is **disabled** for all HubSpot users within your account. To use this feature, you are required to actively enable this feature per HubSpot user within the [app settings](#app-settings).
Our **Reassign Tasks When Record Owner Changes** feature is available for the following object types:
* Contact
* Company
* Deal
* Ticket
* Appointment
* Course
* Listing
* Project
* Service
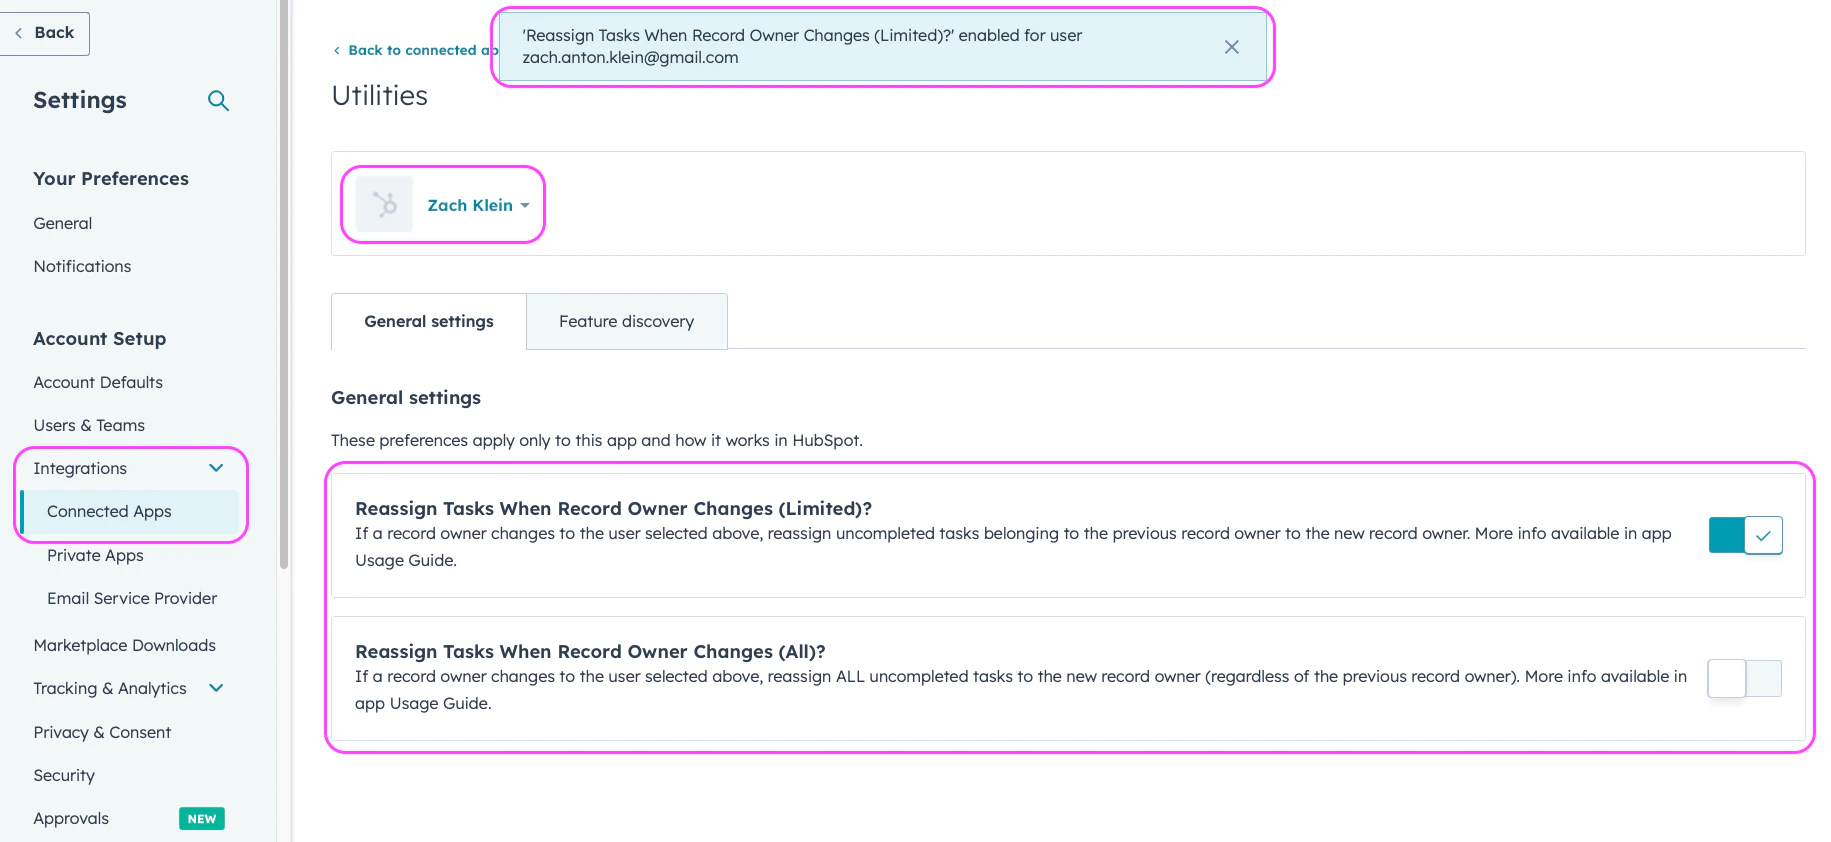 When the **Reassign Tasks When Record Owner Changes (Limited)?** setting is enabled for User Y, if a Contact record's owner is changed from User X to User Y, this feature will automatically reassign all open Tasks owned by User X to User Y.
Furthermore, when the **Reassign Tasks When Record Owner Changes (All)?** setting is enabled for User Y, if a Contact record's owner is changed from User X to User Y, this feature will automatically reassign all open Tasks associated with the given record, **regardless of the Task Owner**.
To enable these settings, first navigate to the **Utilities for HubSpot** app settings area within your HubSpot portal:
Open your HubSpot account and click the icon in the top navigation bar
Click the **Integrations** dropdown item in the left sidebar, then click **Connected Apps**
Find and click **Utilities** in the list of connected apps, then click the **Settings** tab
Once you're within the app settings area, select the relevant HubSpot user via the **HubSpot User** dropdown input. Finally, apply the desired setting by using the relevant toggle. A message should then appear at the top of the screen, confirming whether the given setting is enabled or disabled for the selected user.
Below is a short screen recording showing a basic example of this feature in action.
[Top of section](#reassign-tasks-when-record-owner-changes)
[Top of page](#)
## 5. Google Maps Address Search
* In order to use this feature, you must have an active [**Utilities for HubSpot** subscription](#subscriptions)
* This feature is hidden by default, but can be manually added to **Contact** and **Company** CRM views
Our **Google Maps Address Search** App Card is available for the following object types:
* Contact
* Company
When the **Reassign Tasks When Record Owner Changes (Limited)?** setting is enabled for User Y, if a Contact record's owner is changed from User X to User Y, this feature will automatically reassign all open Tasks owned by User X to User Y.
Furthermore, when the **Reassign Tasks When Record Owner Changes (All)?** setting is enabled for User Y, if a Contact record's owner is changed from User X to User Y, this feature will automatically reassign all open Tasks associated with the given record, **regardless of the Task Owner**.
To enable these settings, first navigate to the **Utilities for HubSpot** app settings area within your HubSpot portal:
Open your HubSpot account and click the icon in the top navigation bar
Click the **Integrations** dropdown item in the left sidebar, then click **Connected Apps**
Find and click **Utilities** in the list of connected apps, then click the **Settings** tab
Once you're within the app settings area, select the relevant HubSpot user via the **HubSpot User** dropdown input. Finally, apply the desired setting by using the relevant toggle. A message should then appear at the top of the screen, confirming whether the given setting is enabled or disabled for the selected user.
Below is a short screen recording showing a basic example of this feature in action.
[Top of section](#reassign-tasks-when-record-owner-changes)
[Top of page](#)
## 5. Google Maps Address Search
* In order to use this feature, you must have an active [**Utilities for HubSpot** subscription](#subscriptions)
* This feature is hidden by default, but can be manually added to **Contact** and **Company** CRM views
Our **Google Maps Address Search** App Card is available for the following object types:
* Contact
* Company
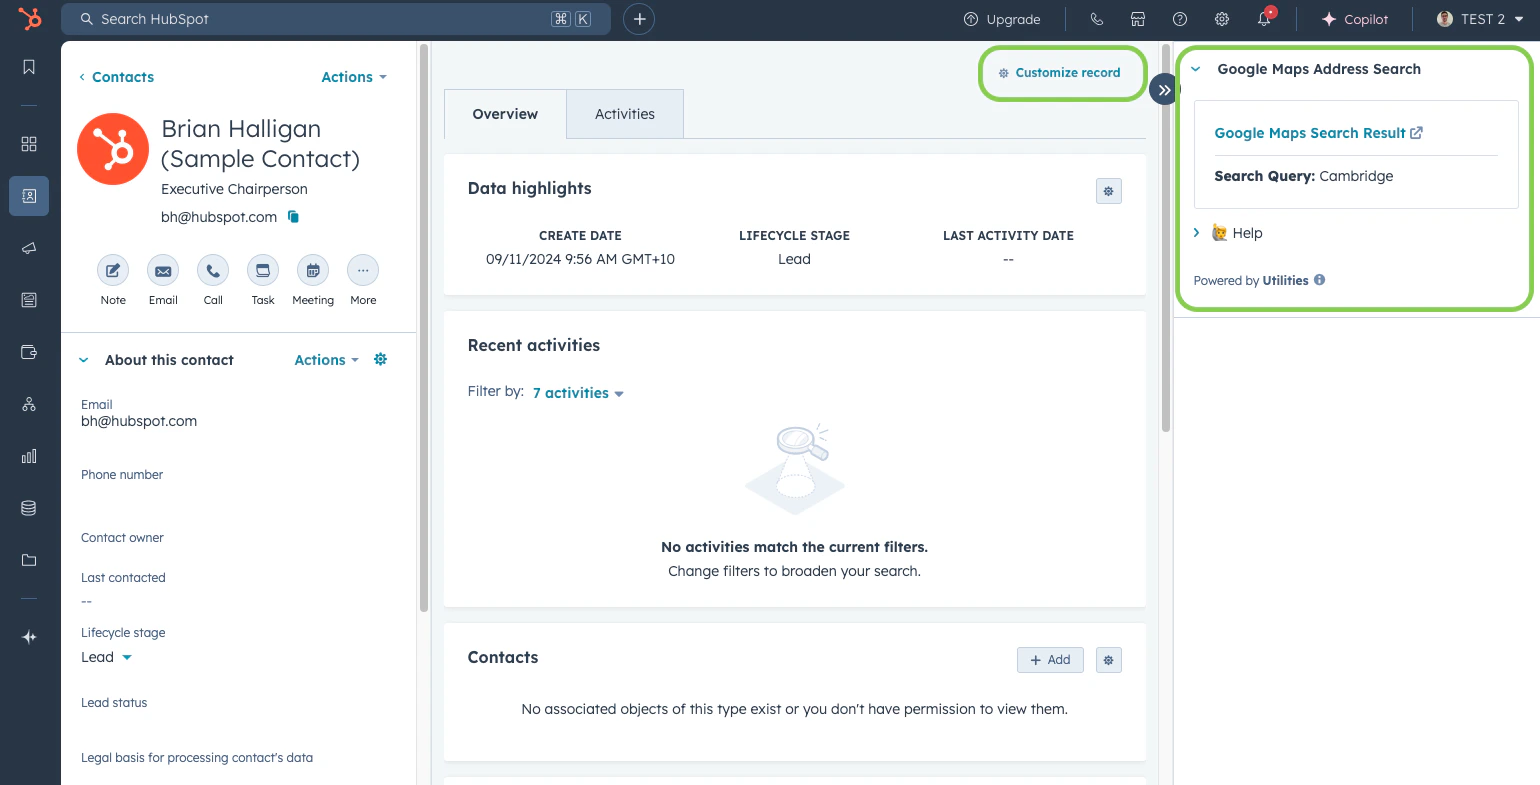 Installing **Utilities for HubSpot** makes available a **Google Maps Address Search** [App Card](https://www.hubspot.com/products/crm/app-cards) within individual **Contact** and **Company** record views. This App Card is hidden by default, but can be manually added to Contact and Company views in the right sidebar by following these steps outlined in either of the following options:
Open your HubSpot account and click the icon in the top navigation bar.
Click the **Objects** dropdown item in the left sidebar, then click **Contacts** or **Companies**.
Click into the **Record Customization** tab and select the relevant CRM view you'd like to add the App Card to.
In the right sidebar, hover over the position you'd like to add the App Card, then click **Add card**. Click into the **Card library** tab, search for **Google Maps Address Search**, click **+ Add Card** and reposition as required.
Close the modal on the right of screen and click **Save and exit**.
Navigate to an individual Contact or Company record view.
Click the **Customize** link, located at the top right of the centre panel.
Select the relevant CRM view you'd like to add the App Card to.
In the right sidebar, hover over the position you'd like to add the App Card, then click **Add card**. Click into the **Card library** tab, search for **Google Maps Address Search**, click **+ Add Card** and reposition as required.
Close the modal on the right of screen and click **Save and exit**
Once the App Card has been added to the relevant HubSpot CRM View, simply locate the **Google Maps Address Search** App Card in the right sidebar and click the **Launch Google Maps** button contained within it. This will open Google Maps in a new browser tab.
The **Search Query** used for Google Maps searches is a combination of the following standard HubSpot properties
* Street address
* Street address 2
* City
* State/Region
* Country/Region
[Top of section](#google-maps-address-search)
[Top of page](#)
## 6. App Settings
**Utilities for HubSpot** comes with a number of user-specific settings, configurable from within HubSpot.
#### User-Specific Settings
By default, user-specific settings can be configured by anyone with **App Marketplace Access** permissions. To access **Utilities for HubSpot** settings, follow these steps:
Open your HubSpot account and click the icon in the top navigation bar.
Via the left sidebar, navigate to Account Management > Integrations > Connected Apps
From the list of apps connected to your HubSpot account, find and click **Utilities**. Then click through to the **Settings** tab.
Please refer to the below table for an explanation of all the user-specific settings available within the **User Settings** tab.
| Setting | Default | Description |
| --------------------------------------------------------------------------------------------------- | ---------------------------------------------------------- | ---------------------------------------------------------------------------------------------------------------------------------------------------------------------------------------------- |
| **[Reassign Tasks When Record Owner Changes (Limited)](#reassign-tasks-when-record-owner-changes)** | OFF | If a record owner changes to the relevant **HubSpot User**, reassign uncompleted tasks that belonged to the previous record owner accordingly. |
| **[Reassign Tasks When Record Owner Changes (All)](#reassign-tasks-when-record-owner-changes)** | OFF | If a record owner changes to the relevant **HubSpot User**, reassign **all uncompleted tasks** to the new record owner. |
[Top of section](#app-settings)
[Top of page](#)
## 7. Uninstall App
If you need to uninstall the app from your HubSpot account, this can be performed via HubSpot's **Connected Apps** settings page.
Open your HubSpot account and click the icon in the top navigation bar.
Via the left sidebar, navigate to Account Management > Integrations > Connected Apps
From the list of apps connected to your HubSpot account, find **Utilities** and click the **Actions** dropdown button. Then click **Uninstall**.
Once the app is uninstalled, your HubSpot account would no longer be connected to the **Utilities for HubSpot** app. As such, you would no longer be able to use any **Utilities for HubSpot** features.
Additionally, any existing HubSpot Workflows leveraging **Utilities for HubSpot** features will be flagged with a **Changes needed** (or similar) alert. Please note, any such workflow executions occurring after the app has been uninstalled will result in errors.
**Utilities for HubSpot** features and associated data are contained entirely within HubSpot. As such, uninstalling the app is the only action required by you to effectively disconnect your HubSpot account from the app. If you have any questions regarding the disconnection of your HubSpot account with the app, please feel free to submit a [support request](https://www.threadi.au/support?app_name=utilities).
[Top of section](#uninstall-app)
[Top of page](#)
Installing **Utilities for HubSpot** makes available a **Google Maps Address Search** [App Card](https://www.hubspot.com/products/crm/app-cards) within individual **Contact** and **Company** record views. This App Card is hidden by default, but can be manually added to Contact and Company views in the right sidebar by following these steps outlined in either of the following options:
Open your HubSpot account and click the icon in the top navigation bar.
Click the **Objects** dropdown item in the left sidebar, then click **Contacts** or **Companies**.
Click into the **Record Customization** tab and select the relevant CRM view you'd like to add the App Card to.
In the right sidebar, hover over the position you'd like to add the App Card, then click **Add card**. Click into the **Card library** tab, search for **Google Maps Address Search**, click **+ Add Card** and reposition as required.
Close the modal on the right of screen and click **Save and exit**.
Navigate to an individual Contact or Company record view.
Click the **Customize** link, located at the top right of the centre panel.
Select the relevant CRM view you'd like to add the App Card to.
In the right sidebar, hover over the position you'd like to add the App Card, then click **Add card**. Click into the **Card library** tab, search for **Google Maps Address Search**, click **+ Add Card** and reposition as required.
Close the modal on the right of screen and click **Save and exit**
Once the App Card has been added to the relevant HubSpot CRM View, simply locate the **Google Maps Address Search** App Card in the right sidebar and click the **Launch Google Maps** button contained within it. This will open Google Maps in a new browser tab.
The **Search Query** used for Google Maps searches is a combination of the following standard HubSpot properties
* Street address
* Street address 2
* City
* State/Region
* Country/Region
[Top of section](#google-maps-address-search)
[Top of page](#)
## 6. App Settings
**Utilities for HubSpot** comes with a number of user-specific settings, configurable from within HubSpot.
#### User-Specific Settings
By default, user-specific settings can be configured by anyone with **App Marketplace Access** permissions. To access **Utilities for HubSpot** settings, follow these steps:
Open your HubSpot account and click the icon in the top navigation bar.
Via the left sidebar, navigate to Account Management > Integrations > Connected Apps
From the list of apps connected to your HubSpot account, find and click **Utilities**. Then click through to the **Settings** tab.
Please refer to the below table for an explanation of all the user-specific settings available within the **User Settings** tab.
| Setting | Default | Description |
| --------------------------------------------------------------------------------------------------- | ---------------------------------------------------------- | ---------------------------------------------------------------------------------------------------------------------------------------------------------------------------------------------- |
| **[Reassign Tasks When Record Owner Changes (Limited)](#reassign-tasks-when-record-owner-changes)** | OFF | If a record owner changes to the relevant **HubSpot User**, reassign uncompleted tasks that belonged to the previous record owner accordingly. |
| **[Reassign Tasks When Record Owner Changes (All)](#reassign-tasks-when-record-owner-changes)** | OFF | If a record owner changes to the relevant **HubSpot User**, reassign **all uncompleted tasks** to the new record owner. |
[Top of section](#app-settings)
[Top of page](#)
## 7. Uninstall App
If you need to uninstall the app from your HubSpot account, this can be performed via HubSpot's **Connected Apps** settings page.
Open your HubSpot account and click the icon in the top navigation bar.
Via the left sidebar, navigate to Account Management > Integrations > Connected Apps
From the list of apps connected to your HubSpot account, find **Utilities** and click the **Actions** dropdown button. Then click **Uninstall**.
Once the app is uninstalled, your HubSpot account would no longer be connected to the **Utilities for HubSpot** app. As such, you would no longer be able to use any **Utilities for HubSpot** features.
Additionally, any existing HubSpot Workflows leveraging **Utilities for HubSpot** features will be flagged with a **Changes needed** (or similar) alert. Please note, any such workflow executions occurring after the app has been uninstalled will result in errors.
**Utilities for HubSpot** features and associated data are contained entirely within HubSpot. As such, uninstalling the app is the only action required by you to effectively disconnect your HubSpot account from the app. If you have any questions regarding the disconnection of your HubSpot account with the app, please feel free to submit a [support request](https://www.threadi.au/support?app_name=utilities).
[Top of section](#uninstall-app)
[Top of page](#)
***
**Utilities for HubSpot** is created and managed by [Thread Integrations](https://www.threadi.au/), a small Australian business providing expert system integration, software development & analytics services.